
Can you use a soaker hose in a vegetable garden? Yes, you can use a soaker hose in a vegetable garden, and it’s a fantastic way to water your plants. A soaker hose is a type of soaker hose irrigation that delivers water directly to the soil, making it a highly efficient garden watering system. This guide will show you how to use one effectively for efficient garden watering.
Watering your garden can feel like a chore, especially when you want to make sure every plant gets just the right amount of hydration. Are you tired of sprinklers that waste water by wetting leaves and pavements? Do you want a way to provide slow watering that deeply hydrates plant roots? Then a soaker hose is your new best friend. It’s a smart choice for water conservation and a great drip irrigation alternative for many garden setups.
This guide will walk you through everything you need to know to make your soaker hose work for you, whether you have a sprawling vegetable patch, delicate flower beds, or even a lawn that needs a drink. We’ll cover setup, usage, maintenance, and troubleshooting.
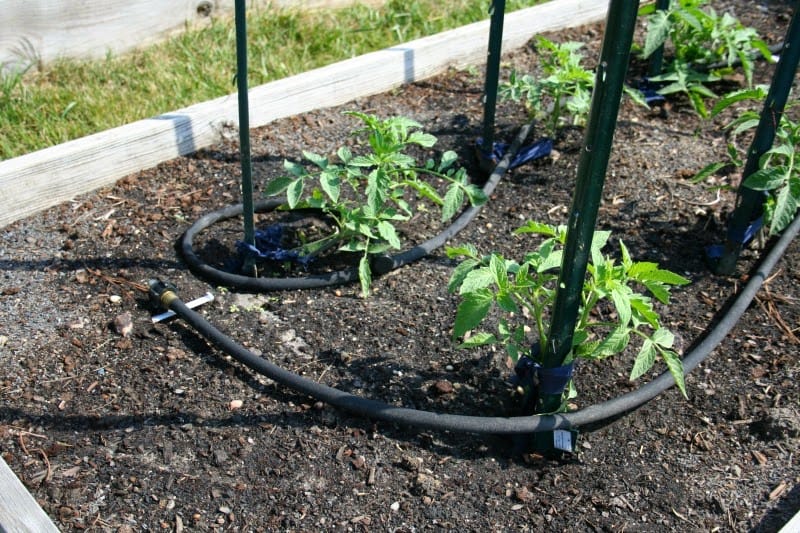
Image Source: homegardenjoy.com
What is a Soaker Hose?
A soaker hose is a perforated tube made from recycled rubber or porous plastic. These tiny holes or pores along its length allow water to seep out slowly and steadily. Unlike sprinklers that spray water into the air, soaker hoses release water directly at the base of your plants, targeting the root zone. This root zone watering approach minimizes water loss through evaporation and prevents foliage from getting wet, which can reduce the risk of fungal diseases.
Key Features of Soaker Hoses:
- Porous Material: The hose itself is designed to “sweat” water.
- Slow Delivery: Water is released gradually over time.
- Direct Root Zone Application: Water goes where it’s needed most.
- Versatility: Suitable for various garden types.
Benefits of Using a Soaker Hose
Choosing a soaker hose for your garden watering needs offers several compelling advantages. These benefits contribute to healthier plants, reduced water usage, and less work for you.
1. Water Conservation
This is arguably the biggest perk. Because water is delivered directly to the soil, evaporation is significantly reduced. You’re not losing water to wind or heat before it even reaches your plants. This water conservation aspect is vital for everyone, especially in drought-prone areas. A soaker hose can use up to 50% less water than traditional sprinklers.
2. Efficient Garden Watering
The efficient garden watering provided by soaker hoses ensures that water penetrates deep into the soil, encouraging strong root development. Plants with deep roots are more resilient and better able to withstand dry spells. Shallow watering, often seen with sprinklers, leads to weaker, surface-level root systems.
3. Reduced Weed Growth
By watering only the plants and not the open soil between them, soaker hoses help keep weed growth in check. Less water in unused areas means fewer opportunities for weed seeds to germinate and thrive.
4. Disease Prevention
Keeping foliage dry is crucial for preventing many common plant diseases, such as powdery mildew and blight. Soaker hoses deliver water at ground level, avoiding unnecessary wetting of leaves and stems. This is particularly beneficial for vegetable garden irrigation.
5. Time Savings
Once set up, a soaker hose system can be automated with a timer. This frees up your time, allowing you to enjoy your garden rather than constantly tending to watering tasks.
6. Suitability for Various Garden Settings
Soaker hoses are incredibly versatile. They are excellent for raised bed watering, where precise watering is often needed to avoid washing away soil. They work wonderfully for vegetable garden irrigation, ensuring that your crops receive consistent moisture. You can even use a lawn soaker hose for targeted lawn hydration.
How to Set Up Your Soaker Hose System
Setting up a soaker hose is straightforward, but a few key steps ensure it works optimally.
Step 1: Planning Your Layout
Before you unroll your hose, sketch out your garden.
* Identify Plant Needs: Group plants with similar watering requirements together.
* Map Hose Placement: Determine the best path for the hose to reach all your plants effectively. Consider the spacing of your plants. For row crops like those in vegetable garden irrigation, running the hose along the rows is ideal. For broader beds, a grid pattern might be more suitable.
* Measure Your Garden: Calculate the total length of soaker hose you’ll need. It’s better to have a little extra than not enough. Soaker hoses are typically sold in lengths of 25, 50, and 100 feet.
Step 2: Connecting to Your Water Source
Your soaker hose needs to connect to a faucet or spigot.
* Backflow Preventer: It’s highly recommended to install a backflow preventer. This device stops garden water from flowing back into your home’s clean water supply, which is a safety measure.
* Hose Washer: Ensure a good quality hose washer is in place in the male end of the soaker hose to create a watertight seal.
* Faucet Timer (Optional but Recommended): For automated watering, attach a battery-operated faucet timer to your spigot before connecting the soaker hose. This allows you to schedule watering times.
Step 3: Laying Out the Hose
Now it’s time to place the soaker hose in your garden according to your plan.
* Follow Plant Rows: For vegetable garden irrigation, lay the hose along the base of your plants in each row.
* Create a Grid: For dense plantings or raised bed watering, you might need to run hoses in parallel lines across the bed, spaced appropriately for even coverage.
* Secure the Hose: Use garden stakes or landscape staples to keep the hose in place and prevent it from moving around. This also helps ensure water is delivered where you intend it to go.
Step 4: Securing the End
The end of the soaker hose opposite the faucet needs to be sealed.
* Hose End Cap: Most soaker hoses come with a cap, or you can purchase one. This prevents water from escaping the end.
* Folding and Securing: Alternatively, you can fold the end of the hose over on itself several times and secure it tightly with a hose clamp or a strong zip tie.
Step 5: Testing the System
Before you leave it to run automatically, do a test run.
* Turn on Water Slowly: Open the faucet gradually. Soaker hoses work best at low pressure. High pressure can force water out too quickly or even burst the hose.
* Check for Leaks: Walk the length of the hose and check for any obvious leaks at connections or seams.
* Observe Water Distribution: See how the water seeps out. Is it evenly distributed? Are there dry spots? Adjust the hose placement if necessary.
How to Use Your Soaker Hose Effectively
Once set up, using your soaker hose correctly is key to maximizing its benefits.
Adjusting Water Pressure
- Low Pressure is Key: Soaker hoses are designed for low-pressure systems. Most home water pressure is too high. You can reduce pressure by:
- Partially Opening the Faucet: Only open the faucet a quarter or half way.
- Using a Pressure Reducer: Install a pressure reducer fitting between your faucet and the soaker hose. This is the most reliable method.
Watering Schedule and Duration
- Water Deeply and Infrequently: This is the golden rule for healthy plant roots. Aim for slow watering that allows water to soak deep into the soil.
- Check Soil Moisture: The best way to know when and how long to water is to check the soil. Dig a finger into the soil a few inches down. If it feels dry, it’s time to water. If it’s moist, hold off.
- Typical Duration: Watering times can vary greatly depending on soil type, weather, and plant needs. Start with 30-60 minutes and check the soil moisture afterwards. You might need to water for several hours for deep saturation, but this should be done less often.
- Best Time to Water: Water early in the morning. This allows plants to hydrate before the heat of the day and minimizes evaporation.
Soaker Hose Placement for Different Garden Types
- Vegetable Gardens: Run the hose along the base of each row, directly between plants. This provides consistent moisture to thirsty vegetables. This method is excellent for vegetable garden irrigation.
- Flower Beds: Lay the hose around the base of flowering plants, weaving it between them to ensure root zone watering.
- Raised Beds: In raised bed watering, you might run the hose in a grid pattern across the bed, or along the main planting lines, depending on the size and density of your plantings. This prevents oversaturation of the soil edges.
- Lawns: For lawn soaker hose use, lay the hose beneath the turf or on the surface in areas that need more water. It’s a good drip irrigation alternative for targeted lawn repair or establishment.
Adapting for Different Soil Types
- Sandy Soil: Water drains quickly. You may need to water more frequently but for shorter durations to prevent water from draining past the root zone.
- Clay Soil: Water drains slowly. Water for longer periods but less often. Be careful not to overwater, as this can lead to waterlogged soil.
- Loamy Soil: This is ideal. Water deeply and moderately often.
Maintenance for Longevity
Proper maintenance will ensure your soaker hose system lasts for years.
Flushing the System
- Regular Flushing: Periodically (e.g., once a month or after heavy use), remove the end cap and let water run at full pressure for a few minutes. This flushes out any sediment or mineral buildup that might clog the pores.
Cleaning and Storage
- Winter Storage: Before the first frost, drain all water from the soaker hose. Coil it neatly and store it in a protected area, such as a shed or garage, away from direct sunlight and extreme temperatures. Water left inside can freeze and expand, damaging the hose.
- Sun Exposure: While some soaker hoses are UV resistant, prolonged exposure to direct sunlight can degrade the material over time. Consider covering your soaker hoses with mulch or soil when not in use.
Checking for Clogs and Damage
- Inspect Periodically: Look for any signs of damage, such as cracks or splits. Check the pores for blockages. If you notice uneven watering, it might indicate clogged pores.
Troubleshooting Common Soaker Hose Issues
Even with the best setup, you might encounter a few problems.
Issue: Uneven Watering
- Possible Causes:
- Low water pressure at the faucet.
- Hose is kinked.
- Uneven terrain.
- Clogged pores.
- Hose length exceeds recommended limits (some manufacturers specify maximum lengths).
- Solutions:
- Check and adjust water pressure.
- Ensure the hose is laid out straight without kinks.
- Use garden staples to keep it in place and level.
- Flush the system thoroughly.
- Consider using multiple shorter hoses connected to a manifold if your garden is very large.
Issue: Water Leaking from the Hose Itself
- Possible Causes:
- Hose is damaged (a hole or crack).
- Hose is old and deteriorating.
- Water pressure is too high.
- Solutions:
- Inspect for damage and patch small holes with waterproof tape or a hose repair kit. For larger damage, replace the section or the entire hose.
- Reduce water pressure at the faucet.
- Consider a higher-quality hose if the damage is due to poor material.
Issue: Water Not Reaching the End of the Hose
- Possible Causes:
- Hose is too long for the available water pressure.
- Faucet is not opened enough.
- Significant leaks elsewhere in the system.
- Solutions:
- Check the manufacturer’s recommended maximum length.
- Open the faucet further, but monitor pressure.
- Inspect the entire length of the hose for leaks and repair them.
Issue: Soaker Hose Bursting
- Possible Causes:
- Water pressure is too high.
- Hose has frozen with water inside.
- Hose is old and has weakened sections.
- Solutions:
- Always use a pressure reducer or a partially opened faucet.
- Drain and store the hose properly before freezing temperatures arrive.
- Replace old, brittle hoses.
Soaker Hoses vs. Drip Irrigation
While soaker hoses are a form of drip irrigation alternative and share many benefits, it’s useful to compare them to more traditional drip irrigation systems.
| Feature | Soaker Hose | Drip Irrigation System (Emitters) |
|---|---|---|
| Water Delivery | Slow seepage along the entire length | Targeted drops from individual emitters |
| Precision | Less precise, water can spread slightly | Highly precise, water goes exactly where emitters are placed |
| Flexibility | Flexible and easy to lay out | Can be more complex to design and install |
| Cost | Generally lower initial cost | Can have a higher initial cost, especially for complex systems |
| Maintenance | Easier to flush, but pores can clog | Emitters can clog, require more individual checking |
| Planting Changes | Less adaptable to frequent plant relocation | More adaptable, emitters can be moved or added |
| Soil Type Suitability | Good for most, but requires attention for clay/sand | Excellent for all soil types due to precise control |
Soaker hoses are a fantastic entry point for efficient garden watering and root zone watering. They are simpler to set up than many elaborate drip irrigation systems, making them an excellent choice for beginners or those looking for a straightforward drip irrigation alternative.
Specific Garden Applications
Let’s explore how soaker hoses excel in particular gardening scenarios.
Vegetable Garden Irrigation
Vegetable garden irrigation is where soaker hoses truly shine. Vegetables require consistent moisture for healthy growth and good yields.
* Deep Roots: Soaker hoses promote the deep root growth essential for many vegetables, helping them withstand stress.
* Disease Prevention: Keeping the leaves of vegetables dry is crucial, especially for those prone to fungal diseases like tomatoes and cucumbers.
* Even Moisture: They provide a consistent moisture level, preventing issues like blossom end rot in tomatoes, often caused by inconsistent watering.
Raised Bed Watering
Raised bed watering presents unique challenges. The soil in raised beds can dry out faster than in-ground gardens due to better drainage and increased exposure to sun and wind.
* Targeted Delivery: Soaker hoses can be laid directly onto the soil surface within the raised bed, ensuring water reaches the roots without excessive runoff.
* Soil Retention: They help prevent the soil from being washed away, which can happen with overhead watering.
* Space Efficiency: In smaller raised beds, a well-planned soaker hose layout can cover the entire planting area efficiently.
Lawn Soaker Hose Use
While sprinklers are common for lawns, a lawn soaker hose can be a lifesaver for specific lawn issues.
* Spot Watering: If you have patches of lawn that dry out more quickly, a soaker hose can provide targeted hydration without overwatering the rest of the yard.
* New Seedings: Laying a soaker hose over newly seeded areas ensures consistent moisture, which is critical for germination.
* Water Conservation: For a whole lawn, a drip irrigation system is often more efficient, but a soaker hose can be a practical and cost-effective solution for smaller lawns or problem areas.
Frequently Asked Questions (FAQ)
Here are some common questions about using soaker hoses:
-
Q: Can I use a soaker hose with my existing sprinkler system?
- A: It’s generally not recommended to connect a soaker hose directly to an existing sprinkler system without proper pressure regulation. Sprinkler systems often operate at higher pressures than soaker hoses can handle. You would need a pressure reducer and potentially a separate zone if your irrigation controller allows.
-
Q: How do I know if I’m watering too much or too little?
- A: The best indicator is checking the soil moisture. Stick your finger about 2-3 inches into the soil. If it feels dry at that depth, water more. If it’s saturated and feels waterlogged, you’re watering too much. Also, observe your plants for signs of stress: wilting can indicate too little water, while yellowing leaves or stunted growth can sometimes be a sign of overwatering.
-
Q: Can I bury my soaker hose?
- A: It’s best to lay soaker hoses on the soil surface or cover them with a thin layer of mulch (1-2 inches). Burying them can make it difficult to monitor their performance, flush them, and can lead to premature clogging. The materials are not designed for burial.
-
Q: What’s the difference between a soaker hose and a drip hose?
- A: A soaker hose is a type of porous hose that seeps water along its entire length. A drip hose (or drip line) has specific emitters at set intervals that release water in controlled droplets. Drip hoses offer more precise control over water delivery, while soaker hoses are simpler to lay out and use. Both are excellent for root zone watering and water conservation.
-
Q: Do I need a special timer for a soaker hose?
- A: You can use a standard hose-end timer that attaches to your faucet. The key is to ensure the timer can be set for the duration and frequency you need, and that you regulate the pressure from the faucet itself.
-
Q: Can I use fertilizer through my soaker hose?
- A: Some specialized systems allow for fertigation (applying fertilizer through the irrigation system), but most standard soaker hoses are not designed for this. Adding liquid fertilizers can clog the pores. If you want to fertilize, it’s best to do so separately using traditional methods.
Conclusion
Implementing a soaker hose irrigation system is a smart, efficient, and eco-friendly way to keep your garden thriving. By delivering slow watering directly to the root zone watering, you’ll see healthier plants, reduced water bills, and less time spent on manual watering. Whether you’re tackling vegetable garden irrigation, raised bed watering, or looking for a reliable drip irrigation alternative, the humble soaker hose proves to be an invaluable tool for efficient garden watering. Follow this guide, and enjoy a lusher, greener garden with less effort and more water conservation.