
Can I test a tachometer myself? Yes, you can test a tachometer yourself with a few simple tools and a bit of know-how. This guide will walk you through the process of ensuring your tachometer is giving you accurate readings, covering everything from basic checks to more in-depth diagnostics.
A tachometer is a vital instrument for any engine, whether it’s in your car, boat, or heavy machinery. It tells you how fast the engine’s crankshaft is spinning, measured in revolutions per minute (RPM). Knowing your engine’s RPM is crucial for proper operation, fuel efficiency, and preventing damage. If your tachometer seems off, or you’ve recently done a tachometer installation check, it’s wise to perform tachometer diagnostics to confirm its accuracy. This article focuses on how to test a tachometer to guarantee you’re getting the most precise information.
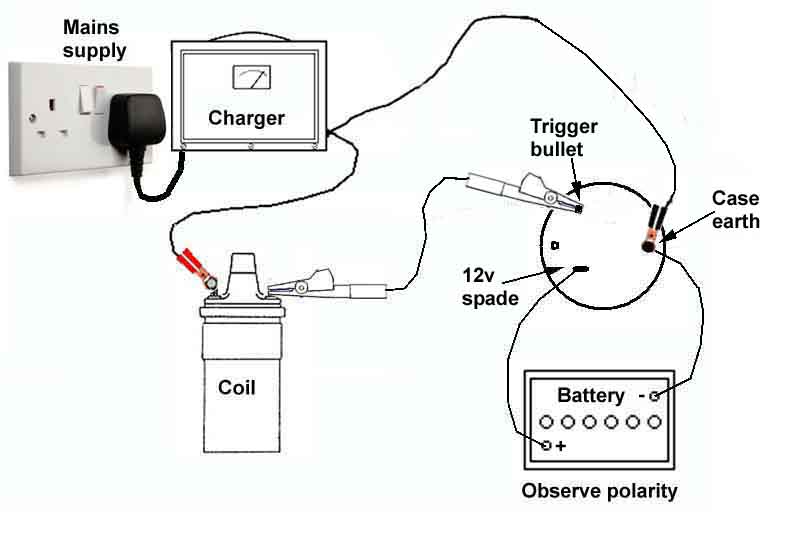
Image Source: www.mgb-stuff.org.uk
Why Accurate Tachometer Readings Matter
Before diving into the testing procedures, let’s touch on why checking tachometer accuracy is so important:
- Engine Health: Operating an engine at incorrect RPMs can lead to premature wear and tear, overheating, or stalling. A faulty tachometer can mislead you into pushing your engine too hard or not hard enough.
- Performance: For enthusiasts, knowing your engine’s RPM helps optimize performance during acceleration, gear shifts, and cruising.
- Fuel Efficiency: Many vehicles and equipment have an “economy zone” for RPMs. An accurate tachometer helps you stay within this zone for better fuel savings.
- Diagnostic Tool: In automotive tachometer testing, a correctly functioning tachometer can help pinpoint engine issues. For instance, an erratic RPM reading might indicate a problem with the ignition system or fuel delivery.
- Safety: In situations where precise engine speed is critical, like operating certain machinery or boats, a malfunctioning tachometer can be a safety hazard.
Basic Tachometer Checks: The First Steps
When you suspect your tachometer isn’t working right, start with these simple checks before moving to more complex tachometer troubleshooting.
Visual Inspection
This is the most straightforward part of tachometer diagnostics.
- Gauge Face: Look for any physical damage to the gauge face, needle, or housing. Is the needle bent or stuck? Is the lens cracked?
- Wiring: For accessible gauges, especially after a recent tachometer installation check, inspect the wiring connections. Ensure they are clean, tight, and not corroded or frayed. Loose or damaged wires are a common cause of faulty readings.
Checking the Needle Movement
With the engine running, observe the tachometer needle.
- Startup: Does the needle sweep across the dial when the ignition is turned on? Many modern tachometers perform a self-test or sweep.
- Engine Speed: Does the needle move smoothly as the engine speed changes? Is the movement jerky or erratic?
- Idle Speed: Does the needle settle to a reasonable idle RPM for your engine type? Consult your vehicle or equipment manual for expected idle speeds.
Comparing with Another Source (If Possible)
If you have access to a second, known-good tachometer or an onboard diagnostic tool (like an OBD-II scanner for cars), compare the readings. This is a quick way of checking tachometer accuracy.
- OBD-II Scanners: For modern vehicles, an OBD-II scanner can often read engine RPM directly from the engine control unit (ECU). This provides a highly accurate baseline for comparison.
Testing Tachometer Accuracy: Deeper Dives
If basic checks don’t reveal the issue or confirm accuracy, it’s time for more involved testing methods. These often involve tachometer signal verification.
How Tachometers Work: A Quick Primer
Most tachometers work by detecting a signal from the engine’s ignition system or a dedicated RPM sensor.
- Inductive Tachometers (Gasoline Engines): These clamp around spark plug wires. They detect the electromagnetic pulse generated each time a spark plug fires. The frequency of these pulses is directly related to engine speed.
- Alternator Tachometers (Older/Diesel Engines): These connect to the “W” terminal on some alternators. The alternator generates a voltage signal that varies with engine speed.
- Electronic/Hall Effect Tachometers: These often receive a signal from the engine’s crankshaft position sensor (CKP) or camshaft position sensor (CMP). This provides a very clean and accurate signal.
- Modern ECU Tachometers: In most modern vehicles, the ECU calculates the RPM based on various sensor inputs and sends this information to the tachometer, often via a data bus.
Method 1: Using an Inductive Tachometer (for Gasoline Engines)
This is a common method for automotive tachometer testing. An inductive tachometer is a portable device that you can use to measure the actual engine speed directly.
Tools Needed:
- Inductive tachometer (often called a “stopwatch tachometer” or “contactless tachometer”)
- Your vehicle or equipment with an engine
- A helper (optional, but recommended)
Procedure:
- Prepare the Engine: Ensure the engine is running. For safety, keep hands and loose clothing away from moving parts.
- Connect the Inductive Tachometer: Most inductive tachometers have a clamp. Attach this clamp around one of the spark plug wires (preferably cylinder #1 for consistency). Ensure the clamp is positioned correctly according to the tachometer’s instructions.
- Set the Tachometer: Many inductive tachometers require you to set the number of cylinders your engine has. This is crucial for accurate readings. For example, a 4-cylinder engine fires once every two revolutions of the crankshaft. A V8 fires eight times per crankshaft revolution.
- Take Readings: Point the tachometer’s sensor at the spark plug wire or its clamp. The display will show the current RPM.
- Compare Readings:
- If your vehicle has its own tachometer: Compare the reading on your inductive tachometer with the reading on your vehicle’s dashboard tachometer.
- If you don’t have a dashboard tachometer or suspect it’s faulty: Use the inductive tachometer as your primary source of truth. Record RPMs at idle, under load, and at various throttle positions.
Interpreting Results:
- Close Match: If the readings are very close (within 50-100 RPM), your dashboard tachometer is likely accurate.
- Significant Difference: If there’s a large discrepancy, your dashboard tachometer may be faulty, or there might be an issue with the signal it’s receiving.
Method 2: Testing the Signal Source (Alternator or Sensor)
This method involves checking the signal that feeds your tachometer.
For Alternator-Based Tachometers (Marine and Diesel)
Many older diesel engines and some marine applications use the alternator’s “W” (Winding) terminal for the tachometer signal.
Tools Needed:
- Digital multimeter (DMM) capable of measuring AC voltage and frequency
- Appropriate test leads for your DMM
- Your boat or vehicle with an engine
- A helper
Procedure:
- Locate the “W” Terminal: Identify the “W” terminal on your alternator. It’s usually a spade or screw terminal. If you’re unsure, consult your engine’s service manual.
- Connect DMM: Connect one lead of your DMM (set to AC voltage or frequency) to the “W” terminal and the other lead to a good engine ground.
- Start the Engine: Start the engine and let it run at idle.
- Measure Voltage/Frequency: Observe the DMM reading. The voltage or frequency will increase as engine speed increases.
- Voltage Method: The AC voltage from the “W” terminal is proportional to engine speed. You’ll need to know the alternator’s specific voltage-to-RPM ratio, which is often provided in service manuals. For example, a common ratio might be 0.5V per 100 RPM at higher speeds.
- Frequency Method: Some DMMs can directly read frequency (Hz). The frequency from the “W” terminal is also proportional to engine speed. Again, a service manual will provide the conversion factor (e.g., 10 Hz per 100 RPM for a particular alternator).
- Compare with Tachometer: While the DMM is connected and reading, also observe your dashboard tachometer.
- If the DMM shows a steady, increasing signal as you rev the engine, the alternator is likely producing a signal.
- If the DMM readings correspond roughly to expected RPMs (based on service manual data), but your tachometer is off, the problem might be with the tachometer itself or the wiring between the alternator and the tachometer.
Troubleshooting Alternator Signals:
- No Signal: Check for loose connections at the alternator and the tachometer. Ensure the “W” terminal is not corroded. If the alternator itself is faulty, it might not produce a signal.
- Erratic Signal: Poor connections or a failing alternator winding can cause erratic signals.
For Sensor-Based Tachometers (Crankshaft/Camshaft Sensors)
Modern engines rely heavily on sensors like the Crankshaft Position Sensor (CKP) and Camshaft Position Sensor (CMP) for engine timing and RPM data. The tachometer often gets its signal indirectly from the ECU, which processes these sensor inputs.
Tools Needed:
- OBD-II scanner (for cars) or appropriate diagnostic tool for your equipment
- Service manual for your vehicle/equipment
Procedure:
- Connect Scanner: Connect your OBD-II scanner to the vehicle’s diagnostic port.
- Access Live Data: Navigate to the live data or PIDs (Parameter IDs) section of the scanner. Look for engine RPM.
- Start Engine: Start the engine and observe the RPM reading on the scanner.
- Compare with Dashboard Tach: Compare the scanner’s RPM reading with your dashboard tachometer.
Interpreting Results:
- Close Match: If the scanner and dashboard tachometer are in agreement, the sensor input and the tachometer itself are likely functioning correctly.
- Discrepancy: If there’s a significant difference, the issue could be:
- The tachometer itself: It might be faulty.
- The wiring between the ECU and the tachometer: Check for damage or loose connections.
- The ECU’s processing: Less common, but possible.
- The primary sensors (CKP/CMP): While these might not cause a complete tachometer failure, erratic sensor data can lead to inaccurate ECU calculations. The OBD-II scanner should also reveal diagnostic trouble codes (DTCs) if there are issues with these sensors.
Method 3: Tachometer Calibration and Adjustment
Some tachometers, especially older mechanical ones or certain aftermarket electronic gauges, might have a calibration adjustment screw. This is usually done during tachometer installation check or if accuracy drifts over time.
Tools Needed:
- Appropriate screwdriver (if applicable)
- Known-accurate RPM source (e.g., an inductive tachometer)
- Service manual for the tachometer or equipment
Procedure:
- Establish Baseline: Use a reliable method (like an inductive tachometer) to determine the engine’s actual RPM.
- Locate Adjustment: Consult the tachometer’s manual or the equipment’s service manual to find the calibration adjustment point. This might be a small screw on the back of the gauge.
- Adjust: With the engine running at a specific, stable RPM, carefully turn the adjustment screw until the dashboard tachometer matches the known-accurate RPM source.
- Test Different RPMs: Check the accuracy at several different engine speeds (idle, mid-range, higher RPMs) to ensure consistent calibration.
Caution: Only adjust calibration if you are sure the tachometer has an adjustment feature and you have a reliable way to verify the actual engine speed. Incorrect adjustments can worsen accuracy.
Tachometer Troubleshooting Scenarios
Here are common issues and how to approach them as part of tachometer troubleshooting:
Scenario 1: Tachometer Reads Zero or is Stuck
- Cause: No signal reaching the tachometer, faulty tachometer, or a break in the circuit.
- Troubleshooting:
- Check connections: Ensure wiring is secure at the signal source (ignition coil, alternator, sensor) and at the back of the tachometer.
- Verify signal source: Use a multimeter or an inductive tachometer to confirm the engine is producing an RPM signal.
- Test the tachometer itself: If you have a known good tachometer, swap it in to see if it works. Alternatively, if your tachometer is electronic, it might have a test input (consult manual).
Scenario 2: Tachometer Reads High or Low Consistently
- Cause: Incorrect setting (e.g., wrong cylinder count for inductive tachs), calibration issue, or internal tachometer fault.
- Troubleshooting:
- Check settings: If using an inductive tachometer, verify the cylinder count is correct.
- Perform calibration: If your tachometer has a calibration adjustment, use an accurate reference to adjust it.
- Test against a known good source: Use an inductive tachometer or OBD-II scanner to compare readings. If your tachometer is consistently off by a percentage, it might be a calibration issue.
Scenario 3: Tachometer Reads Erratic or Jumps Around
- Cause: Intermittent signal loss, poor electrical connections, interference, or a failing tachometer.
- Troubleshooting:
- Inspect wiring: Look for frayed wires, loose terminals, or corrosion. Wiggle the wires while the engine is running to see if the behavior changes.
- Check for interference: Ensure the tachometer wiring is not running too close to ignition wires or high-current electrical components that could induce noise.
- Verify signal stability: Use a multimeter to check the signal at the source. If the signal itself is jumping, the problem is likely before the tachometer. If the signal is steady but the tachometer is jumpy, the tachometer itself is suspect.
Specific Applications
The principles of how to test a tachometer apply across various applications, though the signal sources might differ.
Automotive Tachometer Testing
In cars, the signal typically comes from the ECU, which gets it from the crankshaft or camshaft position sensors. OBD-II scanners are invaluable here for automotive tachometer testing.
Marine Tachometer Testing
Boats often use alternator “W” terminals for tachometers, especially with diesel engines. Saltwater environments can exacerbate corrosion issues, so checking connections diligently is key for marine tachometer testing.
Diesel Tachometer Testing
Diesel engines commonly use the alternator “W” terminal or a dedicated engine speed sensor. Diesel tachometer testing often involves checking the alternator signal as described above.
Tools for Effective Testing
Having the right tools makes checking tachometer accuracy much easier.
- Inductive Tachometer: Essential for gasoline engines.
- Digital Multimeter (DMM): For checking voltage and frequency from signal sources like alternators.
- OBD-II Scanner: Crucial for modern gasoline and diesel vehicles.
- Wiring Diagrams: Always helpful to understand how the tachometer is connected.
- Service Manuals: Provide specific information on signal types, expected values, and calibration procedures for your vehicle or equipment.
Summary Table of Testing Methods
| Test Method | Engine Type | Primary Tools Needed | What it Tests |
|---|---|---|---|
| Visual Inspection & Needle Check | All | Eyes | Physical damage, needle movement. |
| Inductive Tachometer | Gasoline | Inductive Tachometer | Actual engine RPM vs. dashboard tachometer reading. |
| OBD-II Scanner | Modern Gasoline/Diesel | OBD-II Scanner | ECU-reported RPM vs. dashboard tachometer reading; sensor data. |
| DMM (AC Voltage/Frequency) | Alternator-based (some Diesel) | Digital Multimeter | Signal from alternator’s “W” terminal; verifies signal presence and variation with RPM. |
| Signal Source Verification | All (depending on signal type) | Multimeter, OBD-II Scanner, Inductive Tach | Whether the signal reaching the tachometer is correct. |
| Tachometer Calibration | Applicable gauges | Adjustment Tool, Accurate RPM Source (e.g., Inductive) | Fine-tuning the gauge’s accuracy. |
Frequently Asked Questions (FAQ)
Q1: What is a normal RPM range for my engine?
A1: This varies greatly by engine type. Consult your vehicle or equipment’s owner’s manual for specific idle and operating RPM ranges.
Q2: Can I bypass a faulty tachometer?
A2: For diagnostic purposes, yes, but it’s not recommended for regular operation as you lose critical engine speed information. Replacing a faulty tachometer is usually the best solution.
Q3: My tachometer is working, but it’s not accurate. What’s the first thing I should check?
A3: If it’s a gasoline engine, double-check that the inductive tachometer you might be using for comparison is set to the correct number of cylinders. If it’s a built-in tachometer, ensure your vehicle’s settings (if applicable) are correct, and then consider calibration or signal verification.
Q4: I have a diesel engine and my tachometer isn’t working. Where should I start?
A4: For many diesel engines, the tachometer signal comes from the alternator’s “W” terminal. Check the connections to this terminal and the wiring leading to the tachometer. Use a multimeter to check for an AC voltage or frequency signal from the alternator when the engine is running.
Q5: How often should I test my tachometer for accuracy?
A5: It’s good practice to perform a quick visual check periodically. If you notice unusual engine behavior, or after performing significant engine work or a tachometer installation check, then a more thorough accuracy test is recommended.
By following these steps, you can effectively test your tachometer, ensuring it provides accurate readings for optimal engine performance and longevity. Regular tachometer diagnostics are a small but important part of maintaining any engine.