
Can you measure car camber at home? Yes, you absolutely can! While professional shops have specialized equipment, several effective DIY methods allow you to check car camber at home, giving you valuable insights into your vehicle’s suspension. This guide will walk you through how to measure camber at home using readily available tools and simple techniques, making home alignment tools and camber measurement tools for cars accessible for any car enthusiast.
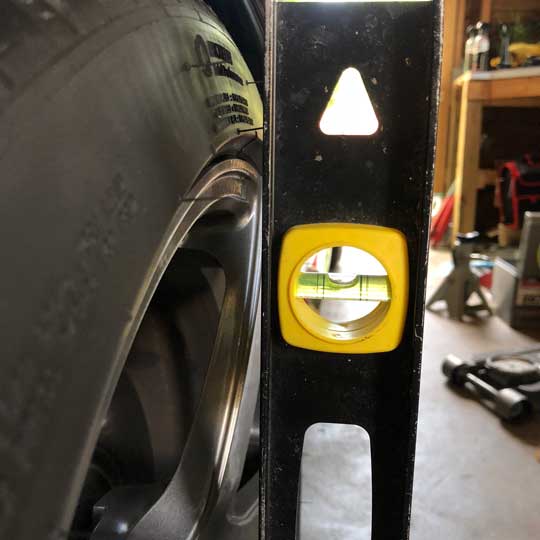
Image Source: p1nation.com
Why Measure Camber?
Camber is a crucial alignment setting that dictates the angle of your wheel relative to the vertical plane when viewed from the front or rear of the vehicle. It plays a significant role in tire wear, handling, and steering response.
- Positive Camber: The top of the wheel tilts outward.
- Negative Camber: The top of the wheel tilts inward.
- Zero Camber: The wheel is perfectly vertical.
Incorrect camber can lead to:
- Uneven Tire Wear: Excessive wear on the inner or outer edge of your tires.
- Poor Handling: The car might pull to one side, feel unstable during turns, or exhibit excessive body roll.
- Compromised Steering: Steering might feel heavy, vague, or cause the steering wheel to not return to center easily.
Regularly checking camber, even with a simple camber check, can help you catch alignment issues before they cause significant problems.
Assessing Your Vehicle’s Camber Needs
Before diving into measurements, it’s helpful to know what your vehicle’s specifications are. You can usually find this information in:
- Your Owner’s Manual: Often lists alignment specifications.
- Vehicle Service Manuals: Provides detailed technical data.
- Online Automotive Forums and Databases: Many enthusiasts share this information.
Knowing your target camber angles will allow you to perform a zero camber home check or assess how far off your current settings are.
Method 1: The DIY Camber Gauge (Makeshift Camber Gauge)
This is perhaps the most common and accessible DIY approach. It involves creating a simple but effective DIY camber gauge.
What You’ll Need:
- A Spirit Level: A longer one (24 inches or more) is better for accuracy.
- A Straight Edge or Ruler: A metal ruler or a sturdy piece of metal that is perfectly straight.
- A Clamp or Strong Tape: To secure the spirit level to the straight edge.
- A Caliper or Measuring Tape: To measure the distance.
- Wheel Chocks: To prevent the vehicle from rolling.
- A Helper (Recommended): To help hold things steady.
- Paper and Pen: To record your measurements.
Steps for Making Your DIY Camber Gauge:
- Prepare the Straight Edge: Ensure your straight edge is perfectly flat and rigid. Any bend will compromise your readings.
- Attach the Spirit Level: Place the spirit level on top of the straight edge, parallel to its length. Use your clamp or strong tape to secure it firmly. Ensure the bubble in the spirit level is centered when the straight edge is perfectly horizontal. This forms your basic DIY camber gauge.
- Park on a Level Surface: This is crucial. A slightly sloped surface will give you inaccurate readings. Use your wheel chocks to secure the vehicle.
- Position the Vehicle: Drive the car forward slowly until the steering wheel is perfectly straight.
- Prepare the Wheel: Ensure the wheel you are measuring is pointing straight ahead.
- Place the Gauge:
- Place the straight edge against the outer face of the wheel, resting on the tire’s sidewall. The straight edge should be parallel to the ground.
- Position the spirit level so it is perpendicular to the straight edge and touching the tire. The goal is to get the spirit level to read the tilt of the tire face.
- Reading the Camber:
- Zero Camber: If the bubble in the spirit level is perfectly centered, your wheel is at zero camber.
- Positive Camber: If the bubble moves to one side, indicating the top of the wheel is leaning out, that’s positive camber.
- Negative Camber: If the bubble moves to the other side, indicating the top of the wheel is leaning in, that’s negative camber.
- Measuring the Angle (The Tricky Part): This is where a makeshift camber gauge gets a bit more involved if you want an actual degree measurement.
- With the spirit level positioned as described, mark the position of the bubble.
- Now, you need to measure the offset. This is where the caliper or measuring tape comes in. You’ll be measuring the distance from the center of the bubble to the edge of the spirit level when the straight edge is perfectly vertical (which is not always easy to achieve simultaneously).
- A more practical approach for a DIYer is to use a known angle. You can buy small angle finder tools that attach to the spirit level or use a protractor in conjunction with your straight edge.
- Alternatively, and perhaps simpler for a simple camber check, you can use the spirit level to gauge “how far off” it is from level. If you have a good spirit level with fine markings, you can estimate the deviation.
- A common DIY method to get a rough degree:
- Place the straight edge and spirit level against the wheel as described.
- Gently try to move the straight edge horizontally until the bubble is perfectly centered. This is your reference point.
- Now, detach the spirit level and attach it to the straight edge at a 90-degree angle to where it was originally.
- Hold the straight edge vertically against the wheel.
- Measure the distance from the bottom of the straight edge to the point where the top of the wheel touches the straight edge. Let’s call this distance ‘A’.
- Measure the diameter of the tire. Let’s call this ‘D’.
- The formula for camber angle (θ) in radians is approximately: θ ≈ 2 * arctan(A / (D/2)) or simply θ ≈ 2A / D for small angles.
- To convert radians to degrees, multiply by 180/π.
This method, while requiring some practice, allows you to perform automotive camber measurement home without specialized equipment. It’s a practical way to achieve a zero camber home check.
Method 2: Using a Digital Level and Smartphone App
Modern technology offers a more precise way to perform checking car camber at home. Many smartphone apps can turn your phone into a surprisingly accurate inclinometer.
What You’ll Need:
- A Smartphone: With a built-in accelerometer and gyroscope.
- A Digital Level App: Search your app store for “digital level,” “inclinometer,” or “angle finder.” Many are free.
- A Sturdy, Flat Object: A metal ruler, a piece of angle iron, or even a flat piece of wood that’s longer than your phone.
- Double-Sided Tape or a Phone Mount: To securely attach your phone to the flat object.
- Wheel Chocks: For safety.
Steps for Using Your Smartphone:
- Mount Your Phone: Securely attach your smartphone to the flat object using double-sided tape or a dedicated phone mount. Ensure the phone’s screen is facing upwards or in a position where you can easily read the angle. The flat object will act as your straight edge.
- Calibrate Your App (If Necessary): Some apps may require a quick calibration on a perfectly level surface. Follow the app’s instructions.
- Park on a Level Surface: As always, a flat, stable surface is essential.
- Position the Device:
- Place the flat object with your phone attached against the tire’s sidewall. The flat object should be as close to the vertical plane of the wheel as possible.
- Ensure the phone’s screen is readable and the app is open.
- Reading the Camber:
- The app will display the angle of your phone relative to gravity. If your phone is perfectly vertical, the reading will be 0 degrees.
- Negative Camber: If the top of the tire is leaning inward, your phone will be tilted slightly outward. The app will show a negative angle.
- Positive Camber: If the top of the tire is leaning outward, your phone will be tilted slightly inward. The app will show a positive angle.
- Zero Camber: The app will read 0 degrees when the wheel is perfectly vertical.
- Measure Both Sides: Repeat the process for all wheels you wish to check. It’s good practice to measure both the left and right side of the same axle to compare.
This method is often easier and provides more precise readings than the purely analog DIY camber gauge, making it one of the better ways to perform automotive camber measurement home.
Method 3: Using a Commercial Camber Gauge (Affordable Options)
While we’re focusing on DIY, there are affordable commercial DIY camber gauge options available that offer more accuracy and ease of use than a purely makeshift setup. These are often referred to as home alignment tools.
Types of Affordable Commercial Gauges:
- Magnetic Bubble Camber Gauges: These are small, often magnetic devices that you stick to the wheel hub or brake rotor (on a flat, non-moving surface). They have a built-in spirit level and a dial that indicates the camber angle. They are great for checking car camber at home.
- Digital Camber Gauges: Similar to the smartphone method but with a dedicated, more robust device. They often have a magnetic base and display readings on an LCD screen.
Using a Commercial Gauge:
- Clean the Mounting Surface: Ensure the hub or rotor face you’re mounting the gauge to is clean and free of debris.
- Attach the Gauge: Most magnetic gauges will simply attach to a suitable metal surface.
- Calibrate (If Necessary): Some digital gauges may require calibration on a perfectly level surface.
- Position the Vehicle: Park on a level surface with the wheels pointing straight ahead.
- Take Readings: Follow the gauge’s instructions. You’ll typically hold the gauge flat on the hub face and read the displayed angle. For more accurate results, you might need to rotate the wheel to different positions.
These tools are designed for camber measurement tools for cars and offer a good balance between affordability and accuracy for DIYers looking for a simple camber check.
Performing a Zero Camber Home Check
A zero camber home check is straightforward with any of the methods above. You are simply looking for the reading to be as close to 0 degrees as possible.
- Using a Spirit Level: The bubble in the center of the spirit level indicates zero.
- Using a Smartphone App: The app should read 0.0 degrees.
- Using a Commercial Gauge: The needle or digital display should indicate zero.
It’s important to note that perfectly zero camber is rarely the factory specification. Most vehicles have slight negative or positive camber as part of their alignment. The goal of a DIY check is to identify if there’s a significant deviation from your vehicle’s specified camber.
Important Considerations for Accurate Readings:
- Level Surface: This cannot be stressed enough. Any slope will throw off your readings.
- Tire Pressure: Ensure your tires are inflated to the correct pressure. Low or high tire pressure can affect the tire’s contact patch and influence measurements.
- Suspension Settling: After parking the vehicle, roll it forward a few inches, then backward a few inches. This allows the suspension to settle into its natural position, providing a more accurate reading.
- Steering Wheel Straight: Make sure the wheels are pointing directly forward.
- Cleanliness: A clean wheel and a clean tool will yield better results.
- Consistency: If you are comparing readings over time, try to use the same method and the same level surface each time.
- Repeatability: Take multiple readings for each wheel and average them if you’re getting slightly different numbers.
- Tool Accuracy: Be aware of the limitations of your chosen tools. A simple spirit level is less precise than a digital gauge.
Interpreting Your Camber Readings:
Once you have your measurements, compare them to your vehicle’s specifications.
| Camber Reading | Interpretation | Action |
|---|---|---|
| Within Spec | Wheel is aligned correctly. | No immediate action needed. Continue monitoring. |
| Slightly Off | Minor deviation from spec. | Consider a professional alignment if other symptoms are present. |
| Significantly Off | Large deviation from spec. | Likely indicates a need for alignment. Check for suspension damage. |
| Uneven (Left vs. Right) | Significant difference between sides. | Implies an alignment issue or potential suspension damage on one side. |
When to Seek Professional Help:
While these DIY methods are excellent for checking car camber at home and performing a simple camber check, they are not a substitute for a professional alignment.
You should consult a qualified mechanic if:
- Your measurements are significantly outside the manufacturer’s specifications.
- You are experiencing noticeable handling problems (pulling, instability, uneven tire wear).
- You have recently hit a pothole or had an accident.
- You are uncomfortable performing the measurements or interpreting the results.
- You want to ensure a precise DIY vehicle alignment camber adjustment, which is best left to professionals with specialized equipment.
Frequently Asked Questions (FAQ)
Q1: Can I adjust my car’s camber at home?
A1: Minor adjustments might be possible on some vehicles with adjustable suspension components, but significant adjustments typically require specialized tools and knowledge. It’s generally recommended to have camber adjustments performed by a professional.
Q2: How often should I check my car’s camber?
A2: It’s a good idea to check your camber periodically, especially if you notice uneven tire wear or changes in handling. Every 6 months to a year, or after any significant event like hitting a large pothole, is a reasonable interval.
Q3: What’s the difference between camber and toe?
A3: Camber is the inward or outward tilt of the wheel when viewed from the front or rear. Toe is the inward or outward angle of the wheels when viewed from above, like the tips of your shoes. Both affect tire wear and handling.
Q4: Is a zero camber home check sufficient?
A4: A zero camber home check is useful for identifying if your wheels are perfectly vertical. However, remember that manufacturers specify optimal camber angles, which might not be exactly zero. Your goal is to ensure your camber is within the specified range for your vehicle.
Q5: Are these home alignment tools reliable?
A5: While they won’t match the precision of a shop’s laser alignment system, home alignment tools and DIY methods can provide reasonably accurate readings for camber, allowing you to identify problems and track changes.
By utilizing these methods, you can gain valuable insight into your vehicle’s alignment and address potential issues early, saving you money on premature tire replacement and ensuring a safer driving experience. This guide empowers you to perform checking car camber at home with confidence.