
Can you install vinyl skirting on a mobile home yourself? Yes, absolutely! Many homeowners successfully tackle DIY mobile home skirting projects, saving money and gaining the satisfaction of improving their homes. This comprehensive guide will walk you through everything you need to know about vinyl skirting installation, from choosing the right materials to the final touches, ensuring a professional-looking finish.
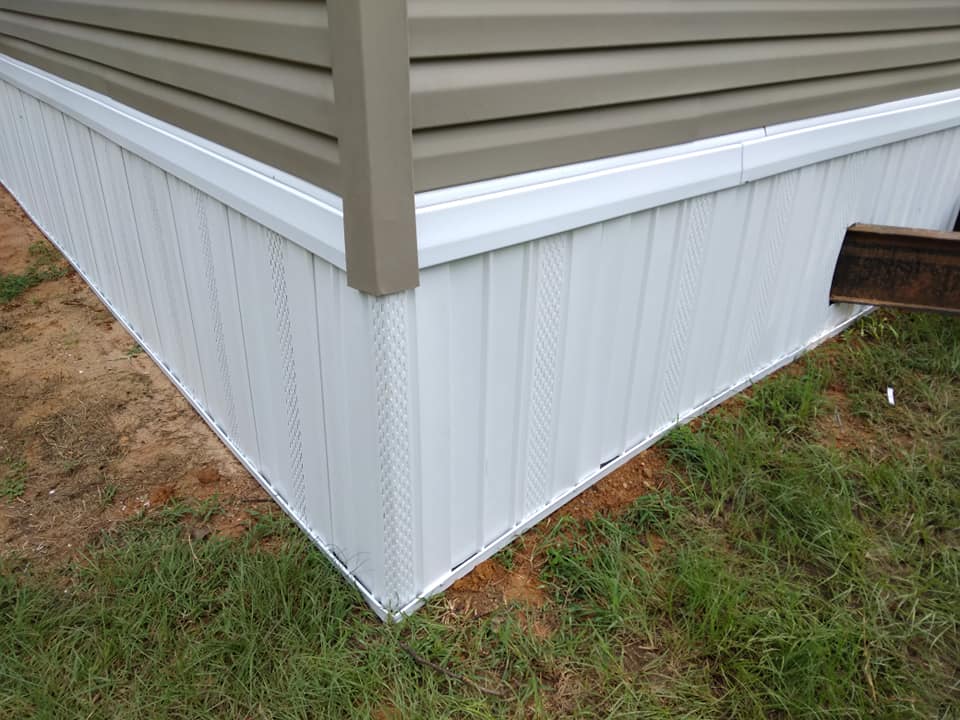
Image Source: cedarspringsme.com
Why Choose Vinyl Skirting for Your Mobile Home?
Vinyl skirting offers a fantastic solution for improving the appearance and functionality of your mobile home. It’s a popular choice for good reason, providing both aesthetic appeal and practical benefits.
Advantages of Vinyl Skirting
- Aesthetics: Vinyl skirting instantly elevates the curb appeal of a mobile home. It hides the unsightly undercarriage, giving the home a more finished and traditional appearance. You can choose from various colors and textures to match your home’s siding.
- Durability: Modern vinyl skirting is made to withstand the elements. It resists fading, cracking, and impact from debris. It won’t rot like wood or rust like metal, making it a low-maintenance option.
- Ventilation: Proper mobile home skirting includes vents to allow for airflow beneath the home. This is crucial for preventing moisture buildup, which can lead to mold, mildew, and wood rot. Many vinyl skirting panels come with pre-drilled or easily insertable vents.
- Pest Control: A well-installed skirting system creates a barrier against pests like rodents, snakes, and insects from entering the crawl space under your home.
- Energy Efficiency: By reducing drafts from beneath the home, vinyl skirting can contribute to better insulation and slightly lower heating and cooling costs.
- Cost-Effectiveness: Compared to other skirting materials, vinyl is generally more affordable, both for the material itself and for installation.
Types of Mobile Home Skirting Panels
When you embark on your vinyl skirting installation, you’ll encounter different styles of mobile home skirting panels. Each has its own look and installation method.
- Solid Skirting: This is the most common type. It offers a clean, uninterrupted look and provides a good barrier against pests and the elements.
- Vented Skirting: These panels have integrated vents or are designed to accommodate separate vent inserts. Proper ventilation is a must.
- Wainscot Style: This design often mimics the look of wood or stone and can add a more decorative touch. It may involve different panel sizes or patterns.
Preparing for Your Vinyl Skirting Installation
Before you start cutting and fastening, thorough preparation is key to a successful vinyl skirting installation. This phase involves gathering materials, measuring, and ensuring your work area is ready.
What You’ll Need: Tools and Materials
Having all your supplies on hand will make the process smoother. Here’s a checklist for your skirting installation guide:
Materials:
- Vinyl Skirting Panels: Measure your home’s perimeter and calculate the total square footage needed. Always buy a little extra to account for cuts and mistakes. Consider purchasing panels in standard lengths that best match your home’s dimensions to minimize waste.
- Top and Bottom Transition Strips (or J-channel): These are used to secure the top and bottom edges of the skirting panels.
- Corner Posts/Trim: Used to cover and protect the outside and inside corners.
- Skirting Fasteners: Special screws designed for vinyl skirting, often with a wide, flat head to distribute pressure. You might also use vinyl-specific nails.
- Vinyl Adhesive: For sealing seams and edges if needed.
- Vents: If your panels don’t have integrated ventilation, you’ll need to purchase and install separate vents. Ensure they are sized appropriately for the required airflow.
- Ground Cover (Optional but Recommended): Landscape fabric and gravel or concrete can be used to cover the ground beneath the home, preventing weed growth and reducing moisture.
Tools:
- Measuring Tape: Essential for accurate measurements.
- Utility Knife or Heavy-Duty Scissors: For cutting vinyl panels. A sharp blade is crucial for clean cuts.
- Circular Saw or Jigsaw: For making precise cuts, especially for around obstacles or creating vent openings. Use a fine-tooth blade for clean cuts on vinyl.
- Drill/Driver: For driving screws.
- Level: To ensure panels are installed straight.
- Pencil or Marker: For marking cuts.
- Safety Glasses: Always wear eye protection when cutting or drilling.
- Work Gloves: To protect your hands.
- Stakes and String (Optional): To help create straight lines for ground preparation.
- Shovel and Rake: For ground preparation.
- Staple Gun (Optional): For attaching landscape fabric.
Measuring Your Mobile Home
Accurate measurements are the foundation of your DIY mobile home skirting project.
- Perimeter Measurement: Walk around your entire mobile home and measure the total length of the perimeter where the skirting will be installed.
- Height Measurement: Measure the distance from the ground to the bottom of your home’s siding. This will determine the height of your skirting panels. Most skirting is around 2-3 feet high, but measure yours precisely.
- Obstacle Identification: Note the location of any pipes, electrical conduits, support posts, or other obstructions that will require cutting around. Mark their positions on your measurements.
- Corner Calculation: Determine the number of corners you have (both inside and outside). This will help you calculate the amount of corner trim needed.
Preparing the Ground Beneath Your Home
A clean and level surface makes the installation much easier and more effective.
- Clear Debris: Remove any rocks, branches, old skirting materials, or other debris from the area around and under the home.
- Level the Ground: If the ground is very uneven, try to level it as much as possible. This helps ensure the skirting sits flush and prevents gaps.
- Weed Prevention: Lay down landscape fabric over the entire ground area under the home. Overlap the edges by at least 6 inches. You can secure it with landscape staples or heavy rocks.
- Gravel or Concrete (Optional): After the landscape fabric, you can add a layer of gravel (about 2-3 inches deep) or pour a concrete perimeter. This further deters weeds and helps manage moisture. Ensure the gravel or concrete slopes slightly away from the home’s foundation.
- Install Foundation Anchors (If Necessary): Some skirting systems require a concrete footer or specialized anchors along the ground perimeter. Consult your skirting manufacturer’s instructions for any specific foundation requirements.
The Vinyl Skirting Installation Process
Now comes the exciting part – putting it all together! This step-by-step approach ensures a professional finish for your mobile home skirting panels.
Step 1: Install Top and Bottom Transition Strips
These strips are crucial for securing the skirting and providing a clean edge.
- Bottom Transition Strip: Attach the bottom transition strip (often a J-channel or a specialized skirting track) to the ground or foundation around the perimeter of the home. Ensure it’s level and securely fastened with appropriate screws or anchors. If you’re using gravel, you might bury the bottom edge of this strip slightly.
- Top Transition Strip: Attach the top transition strip to the bottom edge of your home’s siding or frame. Use a level to ensure it’s perfectly horizontal. Fasten it securely with screws, being careful not to overtighten and crack the vinyl.
Step 2: Install Corner Posts
Corner posts provide structural support and a neat finish at corners.
- Outside Corners: Place the outside corner posts in position. They usually slot into the top and bottom transition strips. Mark screw holes and pre-drill if necessary. Secure the posts with screws.
- Inside Corners: For inside corners, use the appropriate inside corner trim pieces. These also typically slot into the transition strips. Secure them with screws.
- Important: Ensure corner posts are plumb (perfectly vertical) using your level.
Step 3: Cutting and Installing the Skirting Panels
This is where the bulk of the work happens. Take your time for precise cuts.
- Measure and Mark: Measure the distance between your corner posts or transition strips where the first panel will go. Add a slight overlap (usually about 1/2 inch) if the panel is meant to slot into a corner post. Mark the cut line clearly on the vinyl panel.
- Cut the Panel: Using a sharp utility knife, jigsaw, or circular saw with a fine-tooth blade, carefully cut along your marked line. If using a utility knife, you may need to score the vinyl multiple times to get a clean cut. Always cut on a stable surface.
- Test Fit: Place the cut panel into position between the corner posts or against the transition strips. Check that it fits snugly and looks straight.
- Secure the Panel:
- Top Edge: Slide the top edge of the panel into the top transition strip.
- Bottom Edge: The bottom edge should fit into the bottom transition strip.
- Fastening: Use your drill/driver to secure the panel using the specialized vinyl skirting screws. Drive screws through the pre-punched holes in the panel (if present) or along the edges into the transition strips and corner posts. Crucially, do not overtighten the screws. They should be snug but allow the vinyl to expand and contract slightly with temperature changes. Overtightening can crack the vinyl.
- Repeat for Each Section: Continue measuring, cutting, fitting, and fastening each mobile home skirting panel around the entire perimeter.
- Cutting Around Obstructions: When you encounter pipes or posts, carefully measure the dimensions of the obstruction and transfer them to the vinyl panel. Cut out the opening, leaving a small gap (about 1/4 inch) around the obstruction to allow for movement. You can then use a small piece of vinyl or trim to cover this gap cleanly.
Step 4: Installing Vents
Proper ventilation is critical. If your panels don’t have integrated vents, you’ll need to install them now.
- Mark Vent Locations: Plan the placement of your vents to ensure adequate airflow. Typically, vents are placed evenly around the perimeter, often in sections of solid skirting. Consult local building codes or skirting manufacturer recommendations for spacing.
- Cut Openings: Trace the vent shape onto the skirting panel. Use a jigsaw or utility knife to cut out the opening.
- Install Vents: Slide the vents into the openings. Many vents have clips or flanges that allow them to snap or screw into place. Secure them according to the manufacturer’s instructions.
Step 5: Installing Corner Trim and Sealing
The final touches ensure durability and a professional look.
- Corner Trim: For any exposed edges or seams, especially at corners, install the appropriate corner trim pieces. These usually slide over the edges of the skirting panels and are secured with screws into the corner posts or transition strips.
- Sealing: Apply vinyl adhesive along seams where panels meet or at the top and bottom edges if there are any small gaps. This helps prevent water from getting behind the skirting and also adds a layer of security to the panels.
Replacing Mobile Home Skirting
If your existing skirting is damaged or looks worn, replacing mobile home skirting is a manageable project. The process is very similar to installing new skirting.
Removing Old Skirting
- Safety First: Wear gloves and eye protection. Old skirting can have sharp edges.
- Locate Fasteners: Identify how the old skirting is attached. It’s usually screwed or nailed into transition strips and corner posts.
- Careful Removal: Systematically remove screws or nails. If the old skirting is brittle, it may break apart. Work from top to bottom.
- Remove Transition Strips and Posts: Once the panels are off, remove the old top and bottom transition strips and corner posts.
- Clean the Area: Thoroughly clean the area where the new skirting will be installed, removing any old fasteners, debris, or sealant. Inspect the home’s foundation and frame for any damage that needs repair before proceeding.
Installing New Skirting Over Existing
In some cases, if the existing skirting is in decent condition but you want a new look, you might be able to install new panels over it. However, this is generally not recommended as it can trap moisture and hide underlying problems. It’s almost always better to remove the old skirting entirely.
Vinyl Skirting Repair
Accidents happen, and sometimes you might only need a small vinyl skirting repair.
- Minor Cracks or Holes: Small cracks can often be repaired with vinyl repair kits or a strong, exterior-grade adhesive specifically designed for vinyl. Clean the area thoroughly and apply the adhesive or patch according to product instructions.
- Loose Panels: If a panel has come loose, check the fasteners. Tighten any loose screws or add new ones if necessary. If the vinyl itself is torn around a fastener, you might need to replace the entire panel or a section of it.
- Replacing a Section: If a panel is badly damaged, you can cut out the damaged section and replace it with a new piece of vinyl skirting. This requires careful measuring and cutting to match the existing pattern and ensure a secure fit. Use transition strips or specialized vinyl connectors to join the new piece to the existing panels.
Frequently Asked Questions About Vinyl Skirting
Here are some common questions people have when planning their mobile home skirting project.
How much does vinyl skirting cost?
The cost of vinyl skirting can vary depending on the brand, style, and quality. Generally, you can expect to pay between $50 and $100 per panel (typically 4-5 feet wide and 2-3 feet high). For a DIY installation, the total material cost for an average-sized mobile home might range from $500 to $2,000, not including tools or ground preparation materials. Professional installation will add labor costs, often doubling or tripling the material expense.
How many vents do I need for mobile home skirting?
The number and placement of vents are crucial for proper airflow and moisture control. A general guideline is to have at least 1 square foot of ventilation area for every 150 square feet of floor space, or as specified by local building codes. This is often achieved with multiple smaller vents spaced evenly around the perimeter. Consult your skirting manufacturer’s recommendations or local building regulations for specific requirements.
How do I prevent my skirting from blowing away in high winds?
Secure fastening is key. Ensure you are using the correct screws and that they are driven firmly but not overtightened into the transition strips and corner posts. Using mobile home skirting clips can add extra security by reinforcing the connection between panels and the frame. If you live in a very windy area, consider adding extra fasteners or reinforcing the ground perimeter with a more substantial foundation if possible.
Can I paint vinyl skirting?
Yes, you can paint vinyl skirting. However, you must use a paint specifically formulated for vinyl surfaces. Standard latex paint may peel or crack. Look for paints with good adhesion to plastics. Always clean the skirting thoroughly before painting and consider using a primer designed for vinyl. Light colors are generally better as dark colors can absorb more heat, potentially causing the vinyl to warp.
What’s the difference between vinyl skirting and skirting made of other materials?
- Vinyl: Most popular, affordable, low maintenance, comes in various colors, can be prone to cracking in extreme cold if not installed properly.
- Aluminum: Durable, weather-resistant, can dent or scratch, less common for full skirting today but used for panels and trim.
- Wood: Can be attractive and customizable, but requires regular maintenance (painting/staining), susceptible to rot, insects, and warping.
- Concrete/Masonry: Very durable and attractive, but expensive, requires specialized installation, and can be heavy.
For most mobile homeowners, vinyl strikes the best balance of cost, durability, and ease of installation.
Can I install vinyl skirting in winter?
It’s best to avoid vinyl skirting installation in freezing temperatures. Vinyl becomes brittle when cold, making it more susceptible to cracking during cutting and installation. The ideal temperature range for working with vinyl is typically between 50°F and 80°F (10°C to 27°C). If you must work in colder weather, try to do so on a warmer day and bring the vinyl panels inside to warm up before cutting.
By following this detailed skirting installation guide, you can confidently transform the appearance and functionality of your mobile home with durable and attractive vinyl skirting. Remember to prioritize safety, measure accurately, and take your time for a job well done.