
Building a home climbing wall is a fantastic way to get in shape, have fun, and create a unique feature for your home or backyard. You can build a climbing wall in your garage, a spare room, or even as a backyard climbing structure. This guide will walk you through the DIY steps to create your very own climbing wall.
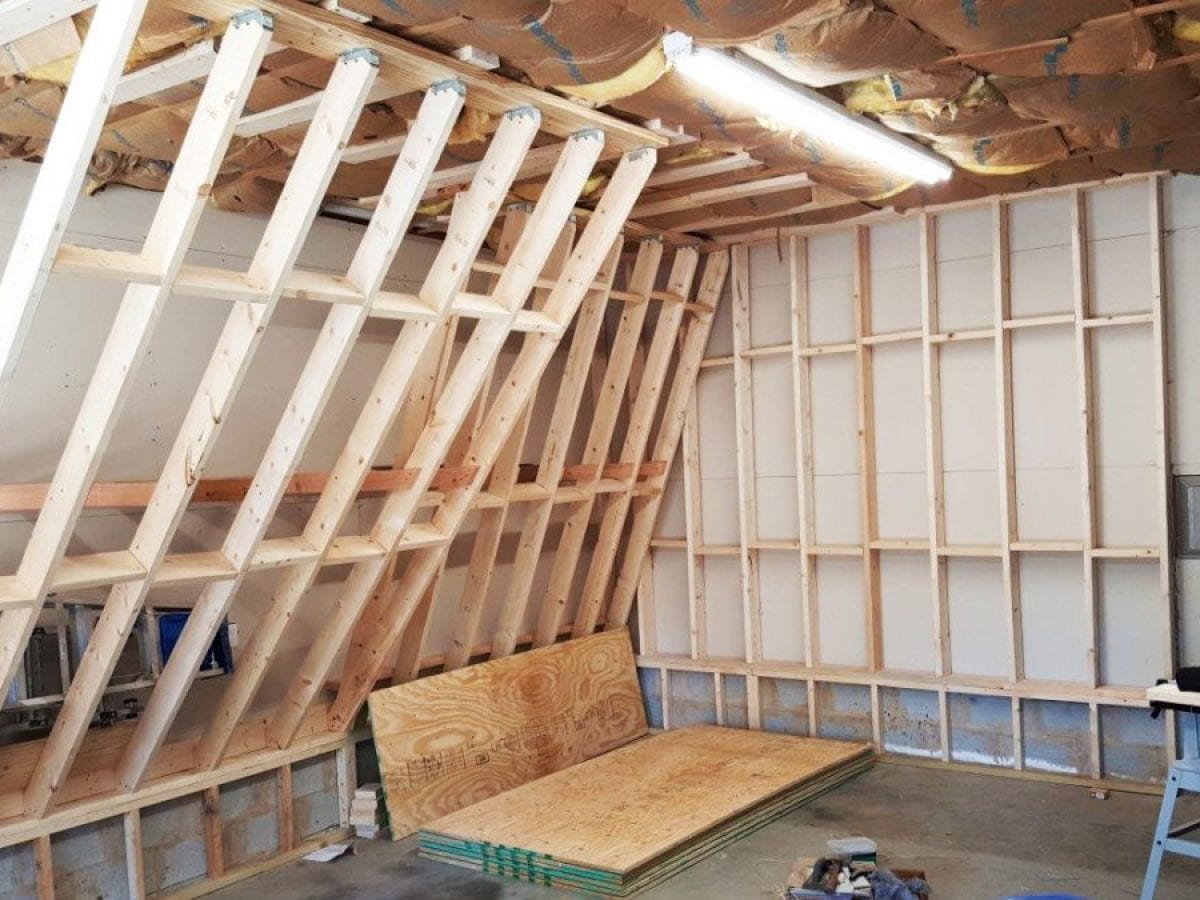
Image Source: www.rei.com
Getting Started: Planning Your Climbing Wall
Before you start swinging hammers, a solid plan is essential. This is where you decide on the size, location, and style of your climbing wall. Think about who will be using it – is it a challenging training climbing wall for experienced climbers, or a fun kids climbing wall?
Choosing the Right Location
Where you build your climbing wall will depend on your available space and preferences.
- Garage Climbing Wall: Garages are often spacious and have sturdy framing, making them ideal. You can build a substantial wall here without taking up living space.
- Indoor Climbing Wall Plans: If you have a spare room or basement, you can create a dedicated indoor climbing wall. Consider ceiling height and any existing structures.
- Backyard Climbing Structure: For outdoor fun, a backyard climbing structure can be a great addition. Ensure it’s built with weather-resistant materials and has a safe landing area.
Design Considerations
- Angle of the Wall: Will it be vertical, slightly overhanging, or severely overhanging? Vertical walls are good for beginners and focus on technique. Overhanging walls build upper body strength and are great for a home bouldering gym.
- Size and Height: How tall and wide will your climbing wall be? Consider your ceiling height for indoor walls and the overall space available for outdoor structures.
- Tension Wood Climbing Holds: The placement and type of holds will dramatically affect the climbing experience. Plan for a variety of holds.
Material Selection
The backbone of your climbing wall will likely be plywood climbing wall panels supported by a robust wooden frame.
- Plywood: 3/4 inch thick BC grade plywood is a common choice. It’s strong and can hold the weight of climbers and holds.
- Framing Lumber: Use sturdy 2×4 or 2×6 lumber for the supporting frame.
- Screws and Bolts: Heavy-duty lag screws and carriage bolts are crucial for securely attaching the panels to the frame and the frame to your existing structure (like wall studs or a garage ceiling joist).
- T-Nuts: These are essential for attaching your wood climbing holds and other climbing hardware to the plywood.
- Climbing Holds: You can buy pre-made climbing holds or create your own using wood. Wood climbing holds can add a unique aesthetic and a different climbing feel.
Step-by-Step Climbing Wall Construction
Once your plan is solid, it’s time to get building! This section breaks down the climbing wall construction process into manageable steps.
Step 1: Building the Frame
The frame is the skeleton of your climbing wall. It needs to be strong and securely attached to your existing structure.
-
For a Wall-Mounted Wall (e.g., Garage Wall):
- Locate wall studs or ceiling joists. These are the strong wooden beams inside your walls or ceiling.
- Measure and cut your 2×4 or 2×6 lumber to create a rectangular or desired shape frame.
- Attach the frame directly to the studs or joists using lag screws. Ensure the frame is level and plumb.
- Add cross bracing within the frame for extra rigidity. Space your supports closely, typically 16 inches on center, to match standard stud spacing.
-
For a Freestanding Structure (e.g., Backyard Climbing Structure):
- This requires more substantial framing, often involving a more complex A-frame or similar design.
- Use thicker lumber like 2×6 or even 4×4 posts for the main supports.
- Anchor the base of the structure securely to the ground, perhaps with concrete footings, to prevent tipping.
- Design cross-members and bracing to ensure stability from all angles.
Table 1: Recommended Lumber Sizes for Climbing Wall Frames
| Wall Type | Frame Material | Support Spacing | Notes |
|---|---|---|---|
| Vertical, Wall-Mounted | 2×4 Lumber | 16 inches | Attach directly to wall studs. |
| Overhanging, Wall-Mounted | 2×6 Lumber | 12-16 inches | Provides more strength for angled loads. |
| Freestanding (Low) | 2×6 Lumber | 16-24 inches | Base needs strong anchoring. |
| Freestanding (Tall/Large) | 4×4 Posts/2×6 | Varies | Requires robust bracing and ground anchoring. |
Step 2: Installing T-Nuts
Before you attach the plywood, you need to install T-nuts. These are threaded inserts that allow you to screw climbing holds into the wall from the front.
- Placement: Decide on the density and pattern of your T-nuts. A common practice is to drill holes and insert T-nuts every 4 to 6 inches, staggered in a grid pattern. This gives you maximum flexibility in hold placement.
- Drilling: Use a drill bit that matches the shaft of your T-nuts. Drill completely through the plywood.
- Installation: Insert the T-nut so the prongs face the side of the wood that will be the climbing surface. Hammer or screw the T-nut in until it’s flush and secure. Ensure the threads are facing outward, ready to receive a climbing hold bolt.
Step 3: Attaching the Plywood Panels
Now it’s time to cover your frame with plywood.
- Cutting: Measure and cut your 3/4 inch plywood to fit the dimensions of your frame. You might need to cut pieces to accommodate different angles if you’re building an overhanging wall.
- Securing: Lay the plywood panels over the frame. Use short, wide wood screws (like drywall screws or deck screws) to attach the plywood to the frame. Drive the screws flush or slightly below the surface so they don’t interfere with climbing holds.
- Overlap: If using multiple panels, consider staggering the joints for added strength, much like laying bricks. Ensure screws go into the frame members for maximum holding power.
Step 4: Adding Texture and Finish (Optional)
- Sanding: Lightly sand the surface of the plywood to remove any splinters.
- Paint: You can paint your climbing wall any color you like. Use durable paint that can withstand friction. Some people add a grip additive to the paint for extra traction.
- Texture: For a more realistic climbing feel, you can mix sand with paint or use specialized textured coatings. This is especially nice for a home bouldering gym.
Step 5: Attaching Climbing Holds
This is the fun part – bringing your climbing wall to life!
- Hold Selection: Choose a variety of holds for different climbing styles: jugs (large, easy to grip), crimps (small edges), slopers (rounded, no distinct edges), and pockets (holes for fingers). For a kids climbing wall, opt for larger, easier-to-grip holds.
- Placement Strategy: Think about the types of routes you want to create. Place holds logically for different difficulties. Don’t be afraid to experiment!
- Installation: Use the appropriate bolts (usually 3/8 inch socket head bolts) to attach the climbing holds to the T-nuts. Tighten them securely.
Table 2: Climbing Holds and Their Uses
| Hold Type | Description | Best For |
|---|---|---|
| Jugs | Large, comfortable grips | Beginners, warm-ups, endurance |
| Crimps | Small edges | Finger strength, advanced climbing |
| Slopers | Rounded, smooth surfaces | Balance, forearm strength |
| Pockets | Holes for one, two, or three fingers | Finger strength, specific grip techniques |
| Pinches | Protrusions designed to be pinched | Pinching strength, specific grip techniques |
| Foot Holds | Smaller, specifically shaped for feet | Crucial for all climbing, provides stability |
Step 6: Safety First: The Landing Zone
A safe landing is paramount, especially for a training climbing wall or a home bouldering gym.
- Padding: Use thick climbing mats (crash pads) or custom-made padding. Aim for at least 6-12 inches of padding depending on the height of the wall and the risk of falling.
- Clearance: Ensure the area around the base of the climbing wall is clear of any obstacles.
- Supervision: Always supervise children when they are using the climbing wall.
Building Wood Climbing Holds (Optional)
Creating your own wood climbing holds can save money and allow for unique designs.
Materials for Wood Holds
- Hardwood: Oak, maple, or birch are excellent choices. They are durable and can withstand the stress of climbing.
- Wood Screws or Dowels: For attaching the holds to the wall.
- Sandpaper: For smoothing the holds.
- Wood Sealant (Optional): To protect the wood and provide a smoother finish.
Steps to Make Wood Climbing Holds
- Design: Sketch out your desired hold shapes. Think about ergonomics and how a climber’s fingers will grip them.
- Cut: Use a jigsaw or bandsaw to cut the wood into your chosen shapes.
- Shape and Smooth: Use rasps, files, and sandpaper to smooth out the edges and create comfortable grip surfaces.
- Drill Mounting Holes: Drill holes for screws or dowels that will attach the holds to the climbing wall. Ensure these holes are countersunk so the screw heads don’t protrude.
- Seal (Optional): Apply a wood sealant if desired, ensuring it dries completely before installation.
Maintaining Your Climbing Wall
Regular maintenance will keep your climbing wall safe and enjoyable.
- Check Holds: Periodically inspect all climbing holds for signs of wear, cracks, or looseness. Tighten any loose bolts.
- Inspect Plywood: Look for any signs of damage, splintering, or warping in the plywood panels.
- Check Frame: Ensure the frame remains secure and that there are no loose screws or bolts connecting it to the wall or ground.
- Clean: Wipe down the climbing wall and holds to remove chalk and sweat.
Frequently Asked Questions (FAQ)
Q1: What is the best type of wood for a climbing wall?
A1: For the main panels, 3/4 inch BC grade plywood is a standard and reliable choice. For structural framing, pine or fir 2x4s or 2x6s are commonly used. For custom wood climbing holds, hardwoods like oak or maple are best.
Q2: Can I build a climbing wall in my apartment?
A2: Building a climbing wall in an apartment can be challenging due to structural limitations and landlord restrictions. If permitted, you might consider a small, portable bouldering wall or a system of hangboards attached to a sturdy frame that doesn’t permanently alter the structure. Always check your lease agreement and get permission.
Q3: How much does it cost to build a home climbing wall?
A3: The cost varies widely depending on the size, complexity, materials used, and whether you buy pre-made holds or make your own. A simple, small DIY climbing wall might cost a few hundred dollars, while a larger, more elaborate home bouldering gym could run into thousands.
Q4: Who is this climbing wall suitable for?
A4: A DIY climbing wall can be designed for anyone from young children (a kids climbing wall with large, easy holds) to serious adult climbers looking for a training climbing wall. The design and hold selection will determine its suitability for different age groups and skill levels.
Q5: What are the dimensions for a typical garage climbing wall?
A5: Garage climbing walls can range from a few feet wide and high to covering an entire wall. A common starting point might be an 8-foot by 8-foot section, or a vertical wall of 8 feet high and 4-10 feet wide. Overhangs can add another dimension.
Q6: How do I ensure my climbing wall is safe?
A6: Safety is paramount. Ensure the frame is securely anchored, use thick padding for the landing zone, regularly inspect holds and hardware, and always supervise climbers, especially children.
Building your own climbing wall is a rewarding project that offers a fantastic way to stay active and have fun right at home. With careful planning and execution, you can create a personalized training climbing wall, an exciting kids climbing wall, or a robust backyard climbing structure that will provide years of enjoyment.