
Insulating under a mobile home is crucial for improving comfort, reducing energy costs, and preventing issues like frozen pipes. You can insulate under a mobile home by first preparing the area, then installing insulation and a vapor barrier, and finally securing the skirting. This guide will walk you through the entire process, from choosing materials to the final touches.
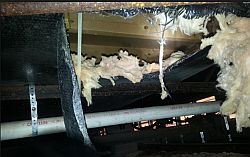
Image Source: underhomearmor.com
Why Insulate Under Your Mobile Home?
Insulating the underside of your mobile home, often referred to as the crawl space insulation mobile home, is a vital task for several reasons. It’s not just about keeping warm in the winter; it plays a significant role in year-round comfort and efficiency.
- Energy Savings: A well-insulated underbelly prevents heated air from escaping and cold air from entering, drastically reducing your heating and cooling bills.
- Comfort: It helps maintain a consistent temperature throughout your home, eliminating cold floors and drafts.
- Pest Prevention: Sealing up gaps and spaces can deter pests from nesting in your crawl space.
- Pipe Protection: In colder climates, insulation prevents water pipes from freezing and bursting.
- Moisture Control: A proper mobile home vapor barrier helps manage moisture, preventing mold and rot.
Preparing the Underbelly for Insulation
Before you can start insulating mobile home belly sections, thorough preparation is key. This step ensures your insulation works effectively and lasts longer.
Inspecting the Underside
Your first step is a comprehensive inspection of the entire underbelly of your mobile home.
What to Look For:
- Existing Insulation: Note the type, condition, and coverage of any current insulation. Is it sagging, wet, or damaged?
- Damage to the Underbelly Material: Check for rips, tears, or holes in the existing material that covers the underside of your home. This is often a thin, flexible material.
- Pest Infestations: Look for signs of rodents, insects, or other pests.
- Plumbing and Electrical: Identify the location of pipes, wires, and any vents. You’ll need to work around these.
- Loose or Damaged Skirting: Assess the condition of your mobile home skirting. This is the material that encloses the space between the ground and the bottom of your home.
Cleaning the Area
A clean space is essential for proper adhesion of materials and to prevent future issues.
Steps for Cleaning:
- Remove Debris: Clear out any fallen leaves, branches, old insulation, or trash.
- Sweep or Brush: If the surface is dry, use a stiff broom to sweep away loose dirt and cobwebs.
- Address Moisture Issues: If you find damp areas, try to identify and fix the source of the moisture (e.g., leaks from plumbing, poor drainage around the home). Allow the area to dry completely before proceeding.
- Pest Control: If you discover pests, consider using traps or contacting a pest control professional before you begin insulation.
Repairing the Underbelly Material
The underbelly material protects your insulation from the elements and pests. Repairing it is a critical step.
Common Repairs:
- Patching Holes: Small tears or holes can often be patched using heavy-duty duct tape specifically designed for outdoor or construction use, or a specialized underbelly repair tape. Ensure the patch extends well beyond the damaged area.
- Replacing Damaged Sections: If large sections are torn or degraded, you might need to replace them with new underbelly material. This could be a vinyl, metal, or treated fabric.
Assessing Skirting Needs
Your mobile home skirting is the first line of defense against the elements.
Key Skirting Considerations:
- Integrity: Is your current skirting intact? Are there large gaps or holes?
- Material: What is your skirting made of? Common skirting materials include vinyl, aluminum, metal, or simulated stucco.
- Attachment: How is the skirting attached? It’s usually secured with screws or clips.
- Ventilation: Mobile homes typically have skirting vents to allow for airflow, which is important for preventing moisture buildup. Ensure these are present and not blocked.
If your skirting is in poor condition, you may need to consider skirting repair or replacement before or during the insulation process.
Choosing the Right Insulation Materials
Selecting the correct insulation is crucial for the performance and longevity of your project. There are several effective options for crawl space insulation mobile home.
Types of Insulation Suitable for Mobile Homes
| Insulation Type | R-Value per Inch (Approx.) | Pros | Cons | Best For |
|---|---|---|---|---|
| Fiberglass Batts | 3.0 – 4.0 | Inexpensive, widely available, easy to handle. | Can be itchy, loses R-value when compressed, susceptible to moisture. | DIYers on a budget, areas with minimal moisture concerns. |
| Rock Wool Batts | 3.0 – 4.2 | Fire-resistant, good soundproofing, more moisture resistant than fiberglass. | Can be more expensive than fiberglass, still requires protective gear. | Areas needing fire resistance, moderate moisture. |
| Rigid Foam Boards | 5.0 – 6.0+ | High R-value, moisture resistant, acts as a vapor barrier when sealed. | Can be more expensive, requires careful cutting and sealing, flammable if not protected. | Areas needing maximum R-value, moisture-prone areas, DIYers comfortable with cutting. |
| Spray Foam (Closed-Cell) | 6.0 – 7.0+ | Highest R-value, excellent air seal, moisture barrier, rigid. | Expensive, professional installation usually required, can be messy. | Maximum efficiency, sealing irregular spaces, areas with high moisture. |
| Spray Foam (Open-Cell) | 3.5 – 4.0 | Good soundproofing, less dense than closed-cell, less expensive than closed-cell. | Lower R-value than closed-cell, can absorb moisture if not sealed. | Soundproofing, sealing irregular spaces where moisture isn’t a primary concern. |
Key Factors to Consider When Choosing:
- Climate: Colder climates require higher R-values.
- Budget: Prices vary significantly between material types.
- DIY Skill Level: Some materials are easier to install than others.
- Moisture Concerns: If your crawl space is prone to dampness, moisture-resistant options are best.
The Importance of the Vapor Barrier
A mobile home vapor barrier is essential for protecting your insulation and the structure of your home from moisture.
What is a Vapor Barrier?
A vapor barrier is a material, typically plastic sheeting (like polyethylene), that prevents water vapor from passing through it. It’s installed on the warm side of the insulation in colder climates, or on the side that will experience higher humidity.
Why it’s Crucial Under a Mobile Home:
- Prevents Moisture Wicking: In cold weather, warm, moist air from inside your home can rise. Without a vapor barrier, this moisture can condense on cold surfaces underneath the home, leading to mold, rot, and damage to insulation and the home’s structure.
- Protects Insulation: Wet insulation loses its effectiveness and can become a breeding ground for mold.
- Reduces Frost Damage: In freezing temperatures, moisture trapped in the crawl space can freeze and expand, potentially damaging pipes and the underbelly.
Installing Insulation: Step-by-Step
Now that you’ve chosen your materials and prepared the area, it’s time to get to work insulating mobile home belly.
Step 1: Install Rigid Foam Boards (If Using)
Rigid foam boards are a popular choice for their R-value and moisture resistance.
How to Install Rigid Foam Boards:
- Measure and Cut: Measure the spaces between your floor joists. Use a utility knife or a specialized foam board cutter to cut the boards to size. You want a snug fit.
- Fit the Boards: Push the cut foam boards into the joist bays, ensuring they fit tightly against the floor and the joists.
- Seal Edges: Use foil tape or specialized foam board tape to seal any gaps around the edges of the boards and where boards meet. This creates an air seal.
- Secure (Optional): For extra security, especially in windy areas, you can use construction adhesive or short screws with washers to attach the boards to the joists.
Step 2: Install Fiberglass or Rock Wool Batts
If you opt for batts, proper installation is key to maximizing their R-value.
How to Install Batts:
- Measure and Cut (If Necessary): Most batts come in standard widths to fit between joists. If your joist spacing is non-standard or you’re filling irregular spaces, cut the batts to fit. Be sure to cut them slightly wider than the opening to ensure a snug fit without compression.
- Place the Batts: Gently place the batts into the joist bays. Ensure the paper or foil facing (if present) is facing upwards, towards the floor of your home (this acts as a vapor retarder in colder climates).
- Fit Snugly: The batts should fit snugly without being compressed. Compression reduces the R-value. If you have plumbing or wiring, carefully cut the batts to fit around them.
- Support (If Needed): For horizontal runs or areas where batts might sag, use pieces of wire or strapping to hold them in place.
Step 3: Install the Vapor Barrier
This is a critical step for moisture control.
Installing a Mobile Home Vapor Barrier:
- Choose the Right Material: Use heavy-duty polyethylene sheeting (6-mil thickness is standard).
- Position the Sheeting: Drape the sheeting across the entire underside of your mobile home, covering all joists and insulation.
- Overlap Seams: Overlap seams by at least 6 inches.
- Seal Seams: Securely tape all seams with a durable, waterproof tape designed for construction use (e.g., foil tape or specialized plastic sheeting tape).
- Secure to the Frame: Attach the vapor barrier to the bottom of the floor joists and the frame of the mobile home using a staple gun or screws with large washers. Ensure it’s taut but not so tight that it rips. The goal is to create a continuous barrier.
Where to Place the Vapor Barrier:
In most climates, the vapor barrier is installed on the warm side of the insulation. For a mobile home, this generally means it should be placed on the inside face of the insulation, facing towards the living space. However, in very humid climates, the placement might be reversed or a more complex system might be needed. Consult local building codes or a professional if you’re unsure.
Step 4: Insulating Around Obstacles
Plumbing, electrical conduits, and ductwork require careful insulation.
Tips for Navigating Obstacles:
- Plumbing: Wrap exposed pipes with pipe insulation sleeves to prevent freezing.
- Electrical: Ensure all electrical boxes and connections are accessible and properly sealed. Avoid covering junction boxes with insulation.
- Ductwork: If ductwork runs under your home, it should also be insulated to prevent heat loss. Use appropriate duct insulation and tape.
- Cutting: Carefully cut insulation batts or boards to fit around these obstacles. Ensure there are no large gaps.
Securing the Skirting and Final Touches
Once the insulation is in place, the skirting needs to be re-secured or installed to complete the enclosure.
Reinstalling or Repairing Skirting Panels
Your mobile home skirting is essential for protecting the insulation and preventing drafts.
Steps for Skirting:
- Clean Skirting Panels: If reusing old panels, clean them of dirt and debris.
- Position Panels: Place the skirting panels back into their original positions.
- Secure Panels: Use appropriate screws or clips to reattach the skirting panels to the home’s frame or siding. Ensure a snug fit against the ground or foundation.
- Seal Gaps: Use caulk or foam sealant to fill any remaining gaps between the skirting panels and the home’s structure, or between panels themselves. This prevents wind and pests from entering.
- Check Vents: Ensure skirting vents are not blocked by insulation or debris.
Considerations for Skirting Materials
- Vinyl: Lightweight, durable, and easy to clean. Can become brittle in extreme cold.
- Metal (Aluminum/Steel): More rigid and durable than vinyl, but can dent.
- Simulated Stucco: Offers a more traditional look, but can be more labor-intensive to install and repair.
Inspecting Your Work
After everything is installed, take a final look.
Final Inspection Checklist:
- Is all insulation securely in place and not compressed?
- Are all seams in the vapor barrier taped and sealed?
- Is the vapor barrier properly attached and taut?
- Is the skirting securely attached and sealed against drafts?
- Are skirting vents clear?
Frequently Asked Questions (FAQ)
Q1: How much does it cost to insulate under a mobile home?
The cost can vary widely depending on the size of your mobile home, the type of insulation you choose, whether you hire a professional or do it yourself, and your local climate’s requirements. DIY projects using fiberglass batts might cost a few hundred dollars, while professional spray foam insulation could run into several thousand dollars.
Q2: Can I insulate the belly of my mobile home myself?
Yes, many homeowners successfully insulate the belly of their mobile home themselves, especially if using fiberglass batts or rigid foam boards. Spray foam typically requires professional installation due to specialized equipment and safety precautions. Always prioritize safety by wearing appropriate personal protective equipment (PPE) like gloves, eye protection, and a dust mask.
Q3: Do I need a vapor barrier if I live in a warm climate?
Even in warm climates, managing moisture is important. A vapor barrier can help prevent condensation from humidity or potential water leaks from reaching your insulation and the underside of your home. However, the placement and necessity of a vapor barrier in very warm, humid climates might differ from colder regions. Consult local building practices or a professional if you are unsure.
Q4: How do I insulate around existing pipes and wires?
For pipes, use foam pipe insulation sleeves. For wires and electrical boxes, ensure they are accessible and properly sealed. Cut insulation to fit snugly around them, but avoid covering junction boxes or electrical connections. Always check local electrical codes regarding insulation near wiring.
Q5: What is R-value and why is it important?
R-value is a measure of thermal resistance, indicating how well a material prevents heat transfer. The higher the R-value, the better the insulation. Your climate and the specific area of your home (e.g., walls, floors, ceilings) will determine the recommended R-value for optimal energy efficiency and comfort.
Q6: What are the best skirting materials for insulation?
While skirting itself isn’t insulation, it plays a role in creating a sealed environment that helps insulation perform better. Vinyl and metal skirting are common and durable. The key is to ensure the skirting is well-maintained, with no large gaps, to prevent drafts and pest entry that can compromise your underbelly insulation. Some specialized skirting products may offer a small degree of insulation value.
Q7: How often should I check my underbelly insulation?
It’s a good practice to inspect your underbelly insulation and skirting at least once a year, ideally in the spring or fall. This allows you to catch any damage, moisture issues, or pest problems before they become significant.
By following these steps, you can effectively insulate under your mobile home, leading to a more comfortable living environment and significant savings on your energy bills.