
Yes, you can perform basic checks and even some adjustments for car alignment at home safely, but it’s crucial to understand the limitations and the necessary precautions. While a full, professional-grade alignment is best left to shops with specialized equipment, DIY car alignment can help maintain your vehicle’s performance and prevent premature tire wear. This guide will explore what you can safely do at home to check and potentially improve your car’s wheel alignment.
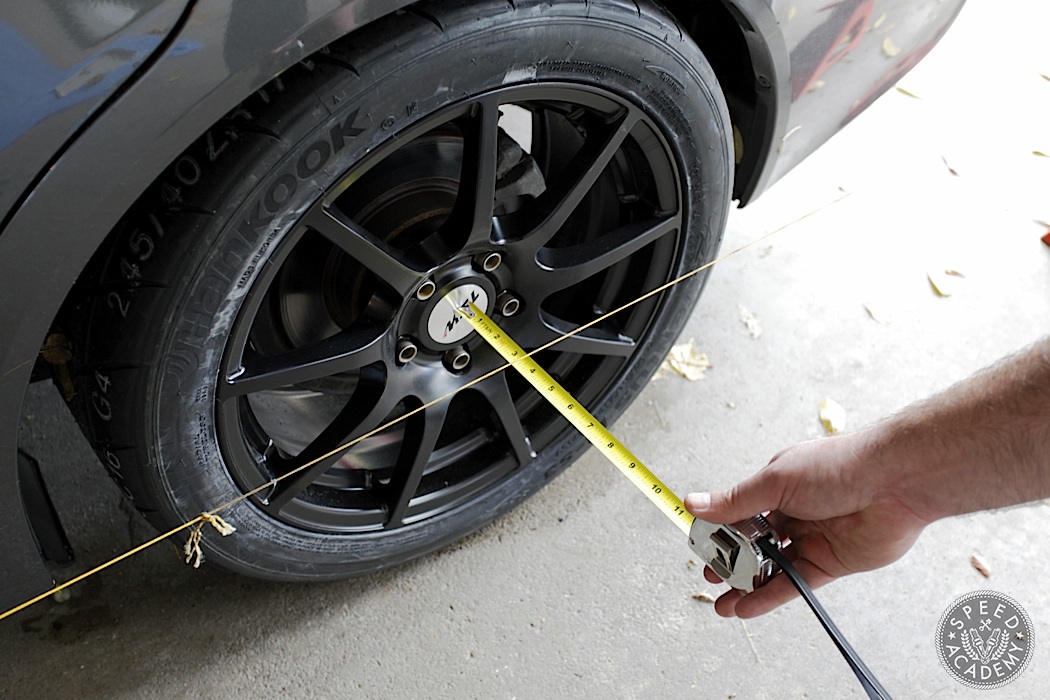
Image Source: speed.academy
Why Wheel Alignment Matters
Proper wheel alignment is critical for your car’s handling, tire life, and overall driving safety. When your wheels are misaligned, it can lead to:
- Uneven Tire Wear: One side of your tires may wear out much faster than the other.
- Poor Handling: Your car might pull to one side, or the steering wheel might not feel centered when driving straight.
- Reduced Fuel Efficiency: Misaligned wheels create more rolling resistance, forcing your engine to work harder.
- Increased Driving Effort: You might find yourself constantly correcting the steering to keep the car going straight.
Factors Affecting Alignment
Several things can knock your car’s alignment out of whack:
- Hitting Potholes or Curbs: Even a minor bump can affect alignment.
- Worn Suspension Parts: Ball joints, tie rods, and bushings can degrade over time.
- Accidents: Any collision, even a fender bender, can impact alignment.
- Heavy Loads: Consistently carrying heavy weight can slightly alter suspension geometry.
Can You Do Alignment At Home?
The answer is a qualified yes. You can certainly perform a personal car alignment check and make some basic adjustments, especially to the toe adjustment at home. However, adjusting camber adjustment DIY and caster alignment home are significantly more complex and typically require specialized equipment and a precise understanding of vehicle dynamics.
What You CAN Do at Home
- Check for Alignment Issues: You can identify many common signs of misalignment.
- Perform Basic Toe Adjustments: With the right tools, you can adjust the toe angle, which is often the easiest part of an alignment to tackle DIY.
- Verify Steering Wheel Alignment: You can ensure your steering wheel is straight when the car is driving straight.
What You Likely CANNOT Do Safely at Home
- Precise Camber and Caster Adjustments: These angles require specialized gauges and a level surface, often a lift, to measure and adjust accurately. Mistakes here can severely impact handling and safety.
- Full Four-Wheel Alignment: Achieving perfect alignment across all four wheels simultaneously is difficult without professional equipment.
Checking Wheel Alignment Yourself: Initial Steps
Before attempting any adjustments, it’s vital to confirm if your car actually needs an alignment. Here’s how you can start checking wheel alignment yourself:
1. The Tire Wear Clues
Inspect your tires closely. Look for:
- Feathering: Where the tread blocks are worn smooth on one edge and sharp on the other. This often indicates toe issues.
- Outer Edge Wear: Typically points to incorrect camber.
- Inner Edge Wear: Also suggests a camber problem.
- Diagonal Wear: Can signify thrust angle issues, where the rear axle is not parallel to the front.
2. The Pull Test
This is a simple but effective way to check for pulling.
- Find a Flat, Straight Road: A deserted parking lot or a quiet, level street is ideal.
- Drive at a Moderate Speed: Around 30-40 mph.
- Lightly Release the Steering Wheel: For a moment, take your hands off the wheel.
- Observe: Does the car drift noticeably to the left or right? If it stays straight, your alignment is likely good in this regard. If it pulls, it’s a strong indicator of an alignment problem.
Important Safety Note: Only perform this test where it is safe to do so, with no other traffic around.
3. The Steering Wheel Alignment Check
When your car is driving straight, your steering wheel should also be centered.
- Drive Straight: On that flat, level road, as straight as possible.
- Check Steering Wheel Position: Is the steering wheel perfectly straight, or is it noticeably turned to one side? If it’s turned, your steering wheel alignment is off, which usually means your car’s alignment needs adjustment.
4. Visual Inspection of Suspension Components
While not a precise measurement, you can visually inspect for obvious damage or wear.
- Look for Leaks: Check for oil or grease leaking from shock absorbers or struts.
- Examine Bushings: Look for cracked or deteriorated rubber bushings in control arms or sway bars.
- Check for Play: Gently try to wiggle suspension components like tie rods to see if there’s excessive play.
DIY Car Alignment: Focusing on Toe Adjustment at Home
The most accessible alignment tools for home use often focus on adjusting the toe. The toe setting refers to the angle of the wheels relative to each other when viewed from above.
- Toe-In: The front of the wheels are closer together than the rear.
- Toe-Out: The front of the wheels are further apart than the rear.
Most modern cars are set for slight toe-in on the front wheels.
Tools for Home Wheel Alignment (Toe)
You don’t need a full alignment rack, but you will need a few key items for toe adjustment at home:
- Measuring Tape or String System: For measuring the distance between the front and rear of the tires. A laser alignment system for home use can also be purchased.
- Wrenches: To loosen and tighten tie rod ends.
- Safety Equipment: Gloves, safety glasses.
- Jack and Jack Stands: To safely lift and support your vehicle.
- Level Surface: Crucial for accurate measurements.
How to Do Toe Adjustment at Home
This process is best done with a helper.
Step 1: Prepare the Vehicle
* Ensure your car is on a perfectly flat, level surface.
* Inflate your tires to the recommended pressure.
* Load the vehicle with normal weight (passengers, fuel) if you want a more accurate measurement, though this is often skipped for DIY adjustments.
Step 2: Measure Current Toe Setting
* Using String:
* Tie a string to a point on the front tire’s sidewall (e.g., a lug nut) and stretch it to a corresponding point on the rear tire’s sidewall on the same side of the car.
* Measure the distance between the front and rear of the tire at this string line.
* Repeat this on the other side of the car.
* Now, measure the distance between the front of the tires and the rear of the tires using the string as your guide. The front measurement should be slightly less than the rear measurement (for toe-in).
* Using a Toe Plate or Laser System: These tools provide more accurate readings and are often easier to use. They work by measuring the distance between the tires at the front and rear.
Step 3: Identify Misalignment
* Compare your measurements to your vehicle’s specifications. You can find these in your owner’s manual or by searching online for your car’s make and model.
* If the front of the tires are significantly further apart or closer together than specified, you have a toe issue.
Step 4: Make Adjustments
* Locate Tie Rods: These are the adjustable linkages connecting your steering rack to the steering knuckle. They usually have a threaded shaft with a locking nut.
* Loosen Locking Nut: Use a wrench to loosen the locking nut on the tie rod end.
* Turn the Tie Rod:
* To increase toe-in (or decrease toe-out), turn the tie rod shaft away from the tire (clockwise when looking from the steering rack). This makes the link shorter.
* To decrease toe-in (or increase toe-out), turn the tie rod shaft towards the tire (counter-clockwise when looking from the steering rack). This makes the link longer.
* Adjust Equally: Make sure to adjust both the left and right tie rods by the same amount and in the same direction to maintain the steering wheel alignment.
* Tighten Locking Nut: Once you’ve made your adjustment, securely tighten the locking nut.
Step 5: Re-Measure and Refine
* After making an adjustment, re-measure your toe setting.
* Repeat the process, making small adjustments, until you are close to the manufacturer’s specifications.
Caution: Over-adjusting can worsen the problem or create new ones. It’s better to make small, incremental changes.
Can You Do Camber Adjustment DIY?
Camber adjustment DIY is considerably more challenging and often not recommended for beginners. Camber is the angle of the wheel relative to the vertical when viewed from the front or rear.
- Positive Camber: The top of the wheel tilts outward.
- Negative Camber: The top of the wheel tilts inward.
Most cars have a slight negative camber for better cornering.
Why Camber is Tricky DIY
- Measurement Complexity: Accurately measuring camber requires specialized gauges that sit flat against the wheel face.
- Adjustment Points: Camber is often adjusted by loosening and moving the position of the control arm mounting bolts or eccentric cams. This can be difficult to access and requires precise positioning.
- Impact on Steering: Incorrect camber can severely affect steering, handling, and tire wear.
If you suspect a camber issue (uneven tire wear on the edges), it’s usually best to consult a professional.
What About Caster Alignment Home?
Caster alignment home adjustments are even more specialized. Caster is the angle of the steering axis when viewed from the side. It affects steering stability and returnability.
- Positive Caster: The steering axis is tilted backward.
- Negative Caster: The steering axis is tilted forward.
Most vehicles have positive caster.
Why Caster is Difficult DIY
- Measurement: Caster is measured in conjunction with other angles and often requires a chassis alignment machine.
- Adjustment: Adjusting caster typically involves shims or eccentric bolts in the suspension, which are difficult to access and require precise placement.
How to Fix Car Alignment at Home: A Realistic Approach
For most DIYers, how to fix car alignment at home realistically means focusing on:
- Diagnosing the Problem: Using the checks outlined earlier to identify potential issues.
- Performing Toe Adjustments: As described above, this is the most manageable DIY alignment task.
- Correcting Steering Wheel Alignment: Ensuring the steering wheel is centered when driving straight.
If you discover significant wear, damage to suspension components, or feel your car pulling strongly, a professional alignment is necessary.
When to Seek Professional Help
There are times when home wheel alignment simply won’t cut it, and you need the expertise of a qualified mechanic.
- After an Accident: Always get an alignment check after any collision.
- Significant Pulling: If your car consistently pulls to one side.
- Uneven Tire Wear: Especially if it’s severe or involves camber issues.
- Worn Suspension Parts: If you find damaged ball joints, tie rods, or bushings.
- After Replacing Suspension Components: Even if you replace a part correctly, alignment can be affected.
- When DIY Adjustments Don’t Work: If you’ve tried toe adjustments and the problem persists.
What Professionals Do
Professional alignment shops use sophisticated equipment:
- Computerized Alignment Racks: These machines measure all alignment angles (toe, camber, caster, thrust angle, setback) precisely.
- Lifts: They lift the vehicle to get full access and make adjustments without the weight of the car affecting measurements.
- Specialized Tools: They have specific tools for loosening and tightening various suspension components and for adjusting eccentric cams.
- Databases: They have access to manufacturer specifications for millions of vehicles.
A professional alignment typically takes about an hour and costs anywhere from $75 to $150, depending on your location and the complexity of the job.
Safety First!
When attempting any DIY car alignment tasks:
- Always Use Jack Stands: Never rely solely on a jack to support a vehicle.
- Work on a Level Surface: This is crucial for accurate measurements.
- Wear Safety Gear: Gloves and eye protection are essential.
- Be Patient: Rushing can lead to errors or injuries.
- Know Your Limits: If you’re unsure, stop and seek professional help.
Frequently Asked Questions (FAQ)
Can I adjust my car’s alignment with just a tape measure?
Yes, you can get a rough estimate and make basic toe adjustments using a tape measure or string. However, for precise alignment, specialized tools or professional equipment are recommended.
How often should I check my wheel alignment?
It’s a good idea to check your alignment if you notice any symptoms like pulling or uneven tire wear. As a preventative measure, checking every 10,000-15,000 miles or annually is often recommended.
What happens if I over-tighten a tie rod locking nut?
Over-tightening can strip the threads of the tie rod or the locking nut, making future adjustments difficult or impossible and potentially weakening the component.
Is it possible to do a front-end alignment at home?
You can perform a toe adjustment on the front end at home. However, adjusting camber and caster on the front end is much more difficult and often requires specialized knowledge and tools.
What is the most common alignment adjustment I can do at home?
The most common and feasible adjustment for DIY car alignment is the toe adjustment at home.
While tackling some aspects of home wheel alignment is possible with careful planning and the right tools, it’s essential to be realistic about the scope and complexity involved. Prioritize safety and accurate measurements. For anything beyond basic toe adjustments, or if you’re experiencing significant handling issues, entrusting your vehicle to a professional alignment shop is the safest and most effective approach.